Search This Blog

Sunday, 29 January 2012

Some links and an answer

I'm still flat out working on a book, but I just took the time out from the trivia of checking the accents on foreign names, italics and all the other things that make a book annoying if they aren't fixed, to look at the link to a 4-minute sequence called The Beauty of Pollination.

I don't have a context for that, but it came from ted.com, which is a source of much wonder to me, and it can be the same for you, if you allow it.  Just go to their home page, and look around.

Of course, I'm a bit of a text person, and I'm Australian, so I like to get my fix each morning of academic thought from around Australia. Some of our best and brightest minds in Australian universities provide background information on what interests them. The emphasis is often on matters to do with politics, either directly or peripherally, but I cannot recommend The Conversation enough.

OK, that's the link, now the answers.  Two posts back, at the end of the entry, I posted two puzzle images.  Here is some extra information to explain.

The first image was of a seaweed, Hormosira banksii, seen at close range with the strands laid out in parallel with the falling tide.  Here are a few more pics of the same seaweed, which is found in both Australia and New Zealand, and which was collected by Sir Joseph Banks in 1770.


To give the reader a scale, each bubble is about 7 mm or a quarter of an inch long. That's near enough for government work.

Saturday, 28 January 2012

I'm unable to come to the keyboard

Well, obviously that isn't quite true.

BUT: I'm getting into the gold book, and the first design draft of Curious Minds has come back from the editor.  This is a history for adult readers, the story of many of the naturalists and natural history painters who flourished in Australia's pre-colonial and colonial past.  It is due to be published in October, 2012,

Now one of the givens of writing is a certain amount of drudgery.  Editors get loads of it when writers get sloppy, but they are good about making writers get unsloppy.

A sensitive writer may whimper slightly at the load, but any sensible writer gets into it, because a stern editor, a demanding editor, is the writer's friend.  One of the changes that I see for the future is a sad decline in writing standards as people bundle e-books onto the market without care, caution, editing or design.  All of those are part of writing a book.

I have only ever had one editor I didn't like, and he was an idiot with no science training who tried to correct my text so that it matched his stupidity.  Luckily, I have had no idiots in the past 30 years.

So, I am whimpering a bit, but getting into the work, and not blogging for a few days.  Then I will try to drag together the threads of gold and get back into that.  Luckily, I leave myself notes in blue italics across the ms of things that need doing.

Catch you in a week or so.

Monday, 23 January 2012

A question of scale and magnification

I grew up with microscopes which were hyped in terms of the magnification they delivered.  The standard eyepiece offered a x10 magnification, the low power objective offered x10 again, giving an overall magnification of x100, while high power was x40, delivering x400, and for really advanced work, I used an oil immersion objective that was x100, giving an overall magnification of x1000.

(Using oil immersion isn't amateur stuff: it requires really thin sections or flat squash preparations, and you have to join the cover skip and the objective with a drop of oil.  It's like walking a tight-rope!  {The first time I heard women routinely swearing was in a final-year undergrad genetics class, and the cause was the same: cracking the cover-slip by driving the objective through it.  The males, let me say, were just as bad, but back then, women swearing was still a bit of a novelty.})

Anyhow, back in the 1960s, and back into the 19th century, you had to draw what you saw with pencil on paper, which was hard on lousy artists.  Even though you probably magnified or reduced what you saw through the eyepiece, you still slavishly reproduced the "magnification" as if it had some magical power.

These days, we tend to use a computer and store the images online, but while the microscope claims a certain magnification, it all depends on what size monitor you are using, along with any resizing that occurs afterwards.  I have shown my rather large monitor before, but viewing the same image on the tablet of the netbook would be very different.

The only proper way to report sizes is to have a standard measure, a calibrated scale that you can superimpose on any image.  This blog entry is about creating a set of those to match the claimed "magnifications" of your microscope.  The careful reader may remember that my little cheap glorified webcam claims to deliver x10, x60 and x200.  As I have said before, and as you will see if you scrutinise the shots here, these figures are a bit rubbery, but first, let's look at focal plane effects.

Here are three shots of a paper-clip, taken at those three magnifications.  As you can see, the camera has trouble keeping the whole of the paper-clip in focus at the higher magnifications.  The pixels may still be tiny, but the whole picture is blurry.  That's why we need thin sections, which is why you need a microtome.

I'm going to avoid further technicalities, but if you want to get really serious, you need to know about resolution, the wave-length of light and other stuff we aren't going to get into right now.  I'm sure some brave soul has explained it all well!

I just want a scale in terms of size, something that can travel with the image and always tell the truth.

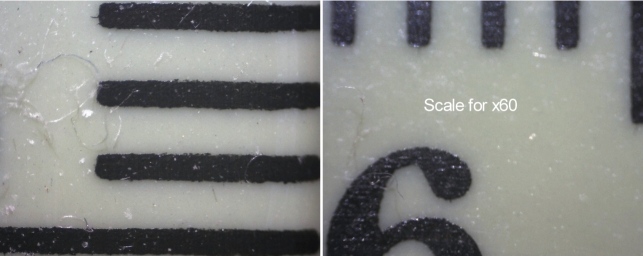
So I put an ordinary millimetre ruler (that's a "rule" in some places).

Then I took shots of it at each of the three magnifications.

Remember that each of these resized pics was originally 1280 x 1024.

That means the scale you see there tells you the size of the field I was looking at.

(This, by the way, is the point where the clever reader will go "Hmmm!" and start doing sums which will reveal how rubbery those claimed magnifications were.)


I wanted to have a reference marker I could paste onto any picture that I took at each "magnification" that would give an accurate scale.

I'm old fashioned, and I used Corel Photopaint to create a white bar, 10 mm long (1), Then I put black cross-bars in at each millimetre (2).  Next, I cropped out the white box (3) and used flood-fill to blacken every second white box (4) and (5).


And here is the final product.  The labels, x10. x60 and x200 have been added, as has the coloured background, so you can see how small these items are.  Notice that I have blown them up here: it is important that the original scale bar goes on every original image, before it is resized or pasted into a blog which may do odd thins when it encounters strange displays.


Once you have your bars, all you have to do is choose the appropriate one, open it and a picture at the same "magnification" and paste it onto that picture.  Most graphics programs will let you drag the pasted image around.  Then label the bar for length, save the composite, and you can resize to your heart's content.

In the example above, I have a very small sea-urchin test, sitting on a ruler, graduated in millimetres.  That's another solution, but it isn't always possible.

This is boring.  I'm not doing any more.  Here's another puzzle for you.


What's this thing?  When I give you the answer, you will see why scale is important!

Oops!  I never did give a link to the answer.  Here it is!

Saturday, 21 January 2012

Wake up and smell the Banksias!

Yesterday was Friday. It was cloudy, getting sunny later, so we took off for a walk in the bush, not too far from home. Today, the rain has been pouring down, and we feel smug, because we took our week-end on the right day. This is a Banksia, a very Australian tree in a genus found only in Australia, one of the Proteaceae, which have a largely southern distribution.

A Banksia flower head. Each of those
spikes is a single flower.
A Banksia flower which is still
developing: note the bee on the
 flower head, which tells us that
nectar is being produced.
The flowers have a sort of eerie beauty, but few Australians realise just how often the plant is to be found on the Australian map.


All over the place, there are swamps called Honeysuckle Swamp, and creeks called Honeysuckle Creek, but very few people are aware that the Banksia flower was used by Aborigines as a source of sweetness for drinks.

Unidentified robber fly, Diptera, Asilidae
They are equally unaware that the early white settlers learned this trick and used it as well, but this is why the name "Honeysuckle" turns up so often on the old maps. People cared about it back then.  Anyhow, we happened to be in an area with lots of Banksia bushes and trees, and we introduced two friends to the sweet smell of the flowers.

The bees were busy, and I managed to spot, chase and snap a robber fly that was supping on a bee which it had captured. Three times it flew to a new tree, carrying its prey with it—which is why I had to chase it.

As near as I could see, the prey was a large bee, so I guess the robber fly was getting a nice sugar hit.  I was pleased, because even though I know what they look like from drawings, this was the first time I had seen one in the wild.

Our friends were good enough to take us out on a track that ends in a cliff, and then show us a narrow foot pad that disappeared off through the trees, snaking its way down and under the cliff to the sea.

It also passed a fascinating mystery sight, which you can see here in its most mysterious form.  Let me just say that this is a really weird angle, and I only knew what it was for certain from where it fell in the sequence of my photos.

This was in the open air, more or less, not in a cave, and this is not a microscopic shot.  The photo covers an area about 4 metres by 3, and there is no faking going on.

This is really what it looks like, but here's another view that may help you believe this.


This is a closer view of the mystery object in the middle. It is hanging on the underside of a sandstone ledge, and the sandstone shows a very aptly-named form of weathering.

There are lots of theories about honeycomb weathering that put the blame on salt spray, but this was about 100 vertical metres above calm sea water, and you can see this same weathering 50 km from the ocean.

In short, I'm not buying those theories, but here is another view, and now you can see a bit of the area outside the overhang, but it's still a bit hard to work out what that dangling thing is.

Think about my theme of honeysuckle, think about the kind of weathering.

If you do that, you might just get it, but probably not,

So look at the fourth picture, where you can see a close-up of the dangling object.  Look at the patterns in it.

Do you see the hexagons?  In all of nature, those things are so distinctive that their name is even given to patterns in weathered stone that imitate the shapes.


Yup!  Honeycomb!  This is an old and by the looks of it, a long-abandoned bees' nest.

I don't know what happened to the bees, but there was a rather emaciated robber fly buzzing around, that made me wonder if I should have taken it in for questioning.

I have no idea at this stage how I will use that material in some future book, but it was definitely a day not to be missed, even if I never get to write about it at all.  Still, knowing me, it will pop up somewhere!

Wednesday, 18 January 2012

A close look at granite

Some rocks, like granite, contain quite large crystals that can be easy to see, once you take the rock apart.

To do this and see the bits, you will need well slides, some pieces of granite or similar coarse-grained igneous rock, cover slips, tweezers (to pick up the fragments), and a large sheet of paper to bang the rocks together over (mind your fingers!).  Where do you get granite?  Well, if you are like me, and pick up small samples of rock wherever you go, and keep them in a jar like this, you will probably have some granite in there. If not, you will have to go looking.

Here is a closer look at the granite bits:

These samples are quite probably granite: they both have lots of quartz and large crystals of other stuff, but I make no promises.  Let me just say that either of them could be taken for granite.


Still, banging the rocks together is just so Neolithic, but since we invented fire, there is a better way, but you will now need a good pair of tongs as well as the other stuff.  If you have a clean barbecue, you can heat the granite piece on that, and then lift it off with tongs and drop it into water.  That is the safest method of using heat on granite.


You can also heat granite held over the flame of a Bunsen or other burner in tongs and then drop it into a saucepan of water, but if you are a younger reader, this needs adult supervision because of the risks of fire and burns.  Have your adult stand by with a glass of water to pour on the granite if you drop it.  Sounds like a case for outside work, doesn't it?

Once the granite is cooled, lift it out of the water with tongs and put it somewhere safe, because the centre is probably still quite hot.  Think fires (unlikely), scorch marks, small children and pets.  Play safe!

Then take some of the small fragments and look at them under the microscope to see if you can identify different minerals, but it might be interesting to see if heat and mechanical action produce different results.  It might be worth looking at any effects of polarised light here, though that sort of work is best done with thin sections of uniform thickness.

Now here is a quote from the past to set you thinking about making your own thin sections.  I have never tried to do this, but that need not stop you.
.  .  .  in the field some amount of information concerning igneous rocks can be obtained by rubbing down the chip on a grindstone and using a whetstone, carborundum file, or water of Ayr stone for the final grinding.  By these and other methods .  .  .  there are obtained slices of rocks which, though thick, uneven, scratched, and all that is bad, from the point of view of the professional maker of thin sections, are nevertheless capable of yielding much information.  With a pocket lens it is possible to make out from such a 'thin' section the nature of the minerals present, the texture and the nature of the rock.
Frank Rutley, Elements of Mineralogy, 22nd edition, 1915, p.  104.
If you have access to high power magnification, why not try a few other rocks?  Can you see crystals in basalt, for example?  (The answer ought to be "no", but why take my word for it?)  What can you see in limestone and sandstone?

Granite crystals form slowly, as magma cools over long periods, so the crystals have time to grow quite large.  Basalt is molten rock that spills out and cools fast, before large crystals can form.

Enjoy!

Sunday, 15 January 2012

Looking at sand under the microscope

Karekare Beach, North Island, New Zealand (polarising filter, somewhat digitally enhanced)


I have been messing around with sand for a while, and testing to see if you can easily distinguish sand from different sources.  One of my tests was to take same samples of "black sand" from Piha Beach on the west coast of New Zealand's North Island, about an easy hour from Auckland, which is on the east coast (the North Island of New Zealand is quite skinny around those parts!)

Sand from the hind dune at Piha Beach.
New Zealand is mostly volcanic, and the black sands of Piha and Karekare (mainly Karekare) feature in the film 'The Piano', so our visit was partly scenic, partly scientific.

By an odd chance, the mp3 CD in the car's player, as we left Karekare was playing Michael Nyman's main theme from 'The Piano', The Heart Asks Pleasure First.

You can see clips from the film and hear this music on Youtube, with a few shots of the beach (see the scene at 49 seconds, for example, and compare it with my picture above).
Wind-sorted sand from high on Piha
Beach, selected because it appeared
to be light in colour.

Now back to the science.  I noticed that the black sands in the dunes at the back of the beach were sorted by the wind into different colours, and in the wave zone by water, so I took small samples to see if there were any big differences.

Because I was aware of possible quarantine issues, I washed and boiled each sample before drying it for a prolonged period in a microwave. It was then sealed in a zip-lock bag for transport.

Even though the sands looked different at a macroscopic level, there was less to spot at the micro level.  I need to pursue this in a more scientific way.


Water-sorted sand from near the wave
zone, selected from the darkest patches.
I think there is a visible difference here.

Now a note about scale here.  Most of the sand shots are x60, but that means little to the reader, since shots are sized, cropped and resized and then viewed on screens of different size.  The key thing to not here is that an uncropped shot covers an area about 4 mm wide and 3 mm high.  I will go into how you measure scales in my next entry.

That gets a bit tricky in the next shot and the last one, which are both composites, with a x10 base carrying a x60 inset.  The full field in x10 is about 16 mm wide and 12 mm high (and it doesn't take too much higher maths to realise that the microscope makers have been playing a bit fast and loose with their "magnifications"!

Anyhow, now you know what you are looking at, and all of these show the full field of the original shot: there may be resizing, but there has been no cropping.
Weathering products, Triassic Hawkesbury sandstone, Sydney.
This is a sample of sand taken from a bush track running through Triassic Hawkesbury sandstone near Sydney.

I used x10 magnification then clipped a part of a x60 shot of the same sample: you can safely assume that the material in the inset appears at the same size that it would have in a full picture of the size: the inset covers an area about 2.5 mm wide and 2 mm high.  Notice how coarse these grains are.


Squeaking sands, New South Wales South Coast: Lake Tabourie and Rennies Beach.
Here are two portions of two x60 shots of "squeaking sands".

My attempts to explain why some hot, dry, Australian sands make a squeaking sound when you walk on them may have delivered a result, but I leave it to the reader to decide whether or not there is the hint of an answer in these shots, when you compare the squeaking sands with the non-squeaking Piha sands or the Triassic grains which are also non-squeaking.

Scale here: the whole frame covers an area 3 mm high.  One of these days, I will make some scale bars to drop in on these pics!

Shell grit from Coller's Beach near Mollymook, New South Wales
South Coast. A careful look at this may provoke a few new and
different investigations from those I have been undertaking.
If you look carefully, there are two views of the same thing here.
I'm going to keep going with this study, and see where it leads.  It may have a place, only a small place, but a possible place, in book project number 5 as mentioned in my last entry.  See if you can race me to an answer or five!

The key variables are probably the mineral content of the sand, its dryness, the grain size and the roundness of the grains, though I have also been looking at uniformity of grain size.

Then there's the amount of organic matter, ranging from zero, up to 100% in the case of bands of shell-grit, like the sample above.


* * * * * * *
This blog covers quite a few different things, so I tag each post. I also blog about history, and I am currently writing a series of books called Not your usual... and the first two have been accepted by Five Mile Press, The offcuts appear here with the tag Not Your Usual... . For a taste of Australian tall tales, try the tags Speewah or Crooked Mick.   For a miscellany of oddities, try the tag temporary obsessions. And language us covered under the tags Descants and Curiosities, while stuff about small life is under Wee beasties.


Saturday, 14 January 2012

I'm worn out!

I will have more to say about this monster a bit later, but he
(or she) is curiously relevant to item 2, Curious Minds.
I did the sums, two days ago. That was when I realised that once again, I have no less than six books in the production cycle.  This is not unusual when writing is what you so for a living.

1.  Australian Backyard Naturalist, which is at the printer, but still needs stuff for the publicity people and work on the notes for teachers who may want to use the book in the classroom.  It isn't a textbook, but there are lots of ideas that teachers can run with, if they are pointed out;

2.  Curious Minds, which is with the editor and requires no action from me right now, except that I am always finding things I can use, of which more later;

3.  The Price of our Hunger for Gold, (working title).  This is a history of the Australian gold rushes from a social and environmental perspective, and it is about a quarter written and stopped while I do some more research;

4. Another book that I am about to pitch to a publisher, about strange inventions.  I'm cleaning up the text, just in case I get lucky;

5.  Another book that I am scoping and planning at the moment, on environmental themes; and

6.  A book project that I am scoping and planning on contract.

So what do you do when you are overloaded?

If you have any sense, in an Australian summer, especially when it is a cool and rainy day, you go walking.

We headed off with friends into a bit of wilderness outside of Sydney, where I got this shot which contains some interesting details that  may prove rather relevant to item 5.

I also picked up this shot of rain drops on Eucalyptus leaves, on a ridge, some 300 metres above the sea.

I will need to look further into this: I suspected at first that it is something to do with the oils in Eucalyptus leaves, but I have never seen it before.

After thinking about it, in all probability, it is more to do with the waxy layer on the leaves, because they are technically xerophytes, plants that do well in dry conditions.

I am a botanist by original training, but there's always new stuff to discover!  Incidentally, on a 15-kilometre walk, I managed to spot no less than 50 species of wildflowers in bloom, which isn't bad.

Here's a closer shot of those leaves, which may help the non-botanist to see why I am curious about why the water is forming droplets like this and not falling off the leaves.

All I can say for now is More Research Needed.

Now back to my monster, as seen above.  I knew this beastie as soon as our two companions found it and showed it to me. I even knew its common name, though until I got home and looked it up, I didn't know its eminent place in Australian biological history.

The last time I saw one of these was in a practical examination in Zoology II in 1967, when we were asked to give as much as we could of its classification. The main point of the question was to see whether we students could spot that this strange animal was a beetle, but my answer was succinct and to the point, because at the start of the year, I had been shown dozens of specimens of this insect by a co-worker. I wrote:

"Coleoptera, Curculionidae, Chrysolopus spectabilis, alias Diamond Beetle".

That might have been the end of my tale, but  I was having a senior moment when I was writing this, I couldn't recall whether the genus was Chrysolopus (correct) or Chrysolophus (wrong), and in looking it up, I learned that the first specimen was taken by Sir Joseph Banks, one of my Curious Minds, at Botany Bay in 1770.  This is why the title I have added to the picture above is "Botany Bay Diamond Beetle or Diamond Weevil".

To be precise, this species was one of just five insects collected (the others were an ant, a butterfly and two flies), so it was one of the very first insects ever collected in Australia.

To the single-minded, everything eventually becomes grist for the mill!!

Tomorrow, it is expected to be raining again, but we will walk later in the week: rainy days make photography problematical.  When we go, I am sure to find something to write about, and I will be going prepared, because all sorts of interesting things come out when the ground is wet.  Writing should also be about having fun and enjoying new discoveries!

Wednesday, 11 January 2012

Wind in the Willows, anachronisms and reviewers


The symphonies of Jean Sibelius are often my companions as I work. I like them, but I also like the fact that he may once have said "Nobody ever erected a statue to a critic".  Writers also have problems sometimes with hack critics, but there are good critics as well.

I would have called E. V. Lucas one of those, but a friend mentioned a reference to "Toad of Toad Hall" in a TV series I don't watch, Downton Abbey, set in the Edwardian era.

Having trick memory for dates, I knew roughly when Wind in the Willows came out, close to the end of the reign of Edward VII.  I scented a possible anachronism (or if not an actual anachronism, a sailing-close-to-the-wind).
I must now rush on quickly and issue a clean bill of health to the script writers: on enquiry and consideration, I declare the above accusation to be not proven—for now.  Apparently, "Edwardian" was only being used by my informant as a loose way of describing a style.
While checking my facts to arrive at this verdict, I read early newspapers ads in Australia and overseas.  That was how I came across the review on the right, published in the Times Literary Supplement.

It looks as though Lucas didn't like the book, not one bit.  He did like two other Kenneth Grahame works, one of which I have heard of (but not read) and another that I have never even heard of.

I also came across a delightful essay by one G. B. Stern, also previously unknown to me, but whose shade I now plan to pursue until I can access some more of Stern's works.

The essay appeared first in the London Daily Chronicle, though I found it reprinted in the Adelaide Register, January 13, 1921.

Stern loved that book, and a number of others that I hold dear.  This is the sort of critic I would happily follow, though in Lucas' case, I think maybe he had just missed the point. Critics and reviewers do that sometimes, and in the TLS that day, his next review was an enthusiastic greeting to another new book, just out, called A Room With a View.  Until further notice, Mr. Lucas remains on my reading list, but I won't be calling for tenders for a statue of him.

Now for book lovers: what books get up to at night.  This is a delightful stop-frame animation.  Go and watch it!  The message: real books are better, but this morning, I have read a number of ads from 1908 in an online version of The Times, a review in an equally online TLS, an essay in a long-defunct Adelaide paper, and after lunch, I will track down e-book forms of the other two Kenneth Grahame volumes and anything by the delightful Ms Stern, Gladys Bronwyn.

PS: linking statues and A Room With a View, Lucas wrote A Wanderer in Florence, which had quite a bit about statues.  I might see if I can dig that out as an e-book as well.  But do e-books dance at night?  I think maybe that is a magical property that real books get from being made from dead trees.

Hmmm.  There's a good plot for a book for small people there!

Monday, 9 January 2012

I'm busy


This is the flat-out writer talking. On the right, you can see what I plan to talk about when I have the time.

Sorry about the silence, but when you write, there are periods like this.  I have been revising a partly completed manuscript, then I stopped to clean up the first chapter of a completed ms so I could "pitch" it, I am now working on teachers' notes for a book due out in May, and that involves getting up-to-date with the latest jargon (the ideas are the same, but the names are changed). This is how innovation happens in education: people rename some existing thing.

For example, they change 'tennis' to 'fardarkling', scribble several articles with long bibliographies full of diatribes by obscure Dutch primitivist post-modernist philosophers who only write in Basque.  These articles have titles like The Curricular Centrality of Fardarkling, and you then say to people "I invented fardarkling" and so you get promoted—but I digress.

Back on topic, I have a new gig to work on, after a meeting today.  It's a research job, targeting ages 8+ and that's about all I plan to say about it for quite some time, as it is somebody else's intellectual property, and a very clever way to stretch young minds.

Let me just say that I will be placing my trust in Jerome S. Bruner: "Any subject can be taught effectively in some intellectually honest form to any child at any stage of development."

There will be feathers, and some time soon!

Sunday, 1 January 2012

Tables and tablets

I have a new plaything, a Samsung Galaxy tablet.  I bought it in New Zealand and originally needed it mainly to read a large pdf file in a hurry, and also to read many, many old books about the gold rush era, that being for the next book, but I am finding all sorts of other uses for my new toy.  That said, one small part of me has been dwelling on the word tablet.

When I was eleven, the educational authorities judged me ripe to have Latin and French instilled by dull sadists with no idea of making the study interesting.  I rote-learned 'La plume de ma tante est sur la table', and 'mensa, mensa, mensam, mensae, mensae, mensa', which we were told was declining mensa, a table in Latin.

It struck me as curious that French and English had the same word for table, while the Romans had a different word.  That led me to wonder about times tables, and so began my career as a marcher to the beat of a different drummer (or sometimes several different drummers at once).  My musings were more interesting than the rote learning that was foisted upon us—not in itself, praise for my musings, save as a contrast to the drear that was foisted upon us.  I upheld my end of the struggle, and remained true to my curiosities, which is why I came of my tablet with a slightly different set of thoughts to others.

You see, by then, I knew a thing or two about that curious word "table" and its diminutive form "tablet", because I had been gathering data in the highways now and then, but mainly in the byways.  Among other things, I found that the Romans also had a similar word, tabula, meaning a board or plank, but by then the juggernaut of my curiosity was moving, so I kept pursuing the meanings of 'table'.

I learned that in the mid-1200s, Alfonso X, Alfonso the Wise of Castile, caused a set of astronomical tables that we now call the Alfonsine Tables, to be published in Toledo, which is why they were sometimes also called 'Toledan tables'.  In 1620, a Swiss watchmaker, Joost Bürgi, published his Arithmetische und geometrische Progress-Tabulen, a set of logarithmic tables, and in 1627, Johann Kepler published a set of logarithms in the Tabulae Rudolphinae, which commemorated his patron Rudolph II, Emperor of Austria, and King of Bohemia.

Those examples aside, most tables in Europe up until the 1600s, and even for quite a long while after it, were tables that you could eat at, or turn on an opponent — or you could drink people under them, but these were all tables with legs, and unless those sitting at them were bent on a bit of graffiti work with their daggers, there would be precious little recorded on those tables.

Yet at some point, the flat slab sort of table became, at least for mathematicians, first and foremost a collection of figures, displayed in a regular grid.  Later, we came to have contents tables, mathematical tables, data tables and tabulation, and even the tab key on our computers, which had been used in setting up tables on the typewriters that gave us our computer keyboard.  This then, is an exploration of tables and how they came to have their modern meanings.

In the Middle Ages and before, the table was more than just a place to eat: it was a place of great social occasion.  Chaucer tells us that the squire in the Canterbury Tales was a fine young man:
Curteis he was, lowely, and servysable,
And carf biforn his fader at the table.
Here, Chaucer reflects on the way that a table you sat at for eating, and where you sat at it in the Middle Ages, was also a sign of rank, a bit of a league table, you might say.  The fact that the squire sat at the same table as his father, the knight of the Tales, and carved for him, defines him as holding high rank.  This follows a comment about the knight himself, earlier in the General Prologue:
Ful often tyme he had the bord bigonne
Aboven alle nacions in Pruce
In other words, the knight sat at the head of the table, or board, in Prussia, where knights of many nations gathered to help the Teutonic Knights war against their heathen neighbours in Lithuania.  So in Chaucer's time, there was no real distinction between a board and a table, but there was a distinction about where you sat at the table.  This distinction is still preserved today in places where honoured guests are seated at the High Table, while other common folk are allocated positions below the salt.

In the Summoner's Tale, we hear of a friar who would beg for food:
A peyre of tables al of yvory,
And a poyntel polysshed fetisly,
And wroot the names alwey, as he stood,
Of alle folk that yaf him any good.
But once he was out of their sight,
He planed away the names everichon
That he biforn had written in his tables
The dirty dog!

While these tables that the friar used were associated with food in a way, they were small enough to carry around.  In fact, they were wax-coated ivory tablets, on which he scribed with a carefully pointed stylus (the poyntel), but then as soon as he was out of sight, with a quick wipe, he flattened the surface, ready to start a new sucker list on what the Romans would have called a tabula rasa, a clean table (in the sense of a plank or board).  The Romans were rather keen on using tables to display things, and these were often slabs of marble, on which important things were carved.  Their Twelve Tables enshrined the basis of Roman law, and when Cicero was a boy, he was required to learn these by heart.  Moses is usually depicted as coming off Mount Sinai with the Ten Commandments on two tablets of stone.

So this type of table was often a tablet, more like the 'table book' that Shakespeare has Nathaniel use in Love's Labours Lost than any item of furniture (or medication).  We still call a notepad (the non-computer sort) a 'writing tablet' today, occasionally, but a table is more commonly a flat slab with legs, used for sitting at, or perhaps it is used for a governing council of some sort, though we still speak always of a board of directors, even if they sit at a 'board table'.  Documents drawn to the attention of those present are tabled, meaning they are placed on an item of furniture.

Shakespeare uses both 'board' and 'table', in roughly equal proportions to indicate an eating place, but he refers in his sonnets and elsewhere to the tables of the heart, apparently meaning something like loving memory, something that could be written on like a writing tablet, but this leaves open the question of how we came to have other sorts of tables.

The original table was a flat slab or board, that might be thrown across trestles to make the furniture sort of table, but they could also be used to inscribe rules, laws and commandments, and both these meanings apply to the Old English tabule, but the mathematical use appears to come from astronomy.  In the Franklin's Tale, Chaucer writes of Aurelius bringing forth his "tables Tolletanes", his Toledan astronomical tables, and Chaucer notes that they were "ful wel corrected", so the tables were written on something correctable.

Could it be that astrologers and such carried these tables around on slabs, or maybe even on wax-coated ivory tablets like those of the Summoner? This was before the start of printing, and so it is at least possible.  After all, astronomers, long after that time, recorded their results on planks of timber, which were sometimes, in some contexts, referred to as tables, at least in a figurative sense.  In 1390, John Gower wrote "He broghte him sauf upon a table, Which to the lond him hath upbore", describing somebody coming ashore from a shipwreck, clinging to a plank.

The other piece of evidence for this speculation that a plank was used in place of paper comes from Urbain Leverrier, the French astronomer, and his encounter in 1859 with an amateur called Lescarbault.  This man, who turned out just to be a poor observer who was mistaken, had apparently detected a planet near the sun, the hypothetical planet Vulcan, and Leverrier was keen to get Lescarbault's data, and define the orbit of the planet, but to do that, he needed enough data to calculate the orbit, and that meant getting all of the observations of black dots that Lescarbault had recorded.

This was at a time when paper was still quite expensive, and sadly for Leverrier, the man's figures were all kept on a board, for lack of paper, and he planed all the old figures off when he had no further use for them.  By then, 'tables of contents' were common, so perhaps we got the new use from something like the 'times table' that might be displayed on a board in a school room, though Charles Babbage published a Table of Logarithms in 1827.

There was also an 1826 paper that Babbage read to the Royal Society about an engine "for the purpose of calculating tables and impressing the results on plates of copper" — perhaps those copper plates were tables? The term certainly dates back as far as 1805, so far as life expectancies were concerned, because in that year, Joseph Banks urged the famous Captain Bligh to become Governor of New South Wales, observing in passing that Bligh's life was not yet over: 'I apprehend that you are about 55 years old — if so you have by the tables an expectation of 15 years' life'.

It probably matters little, for all those tables, logarithm, trigonometric and even probability, have all been replaced by a calculator, just as surely as the 'log tables' once replaced Napier's bones.  If we did not still have the periodic table and timetables to explain, we could probably let the matter rest.  Then again, maybe those are exactly the sort of tables that can be displayed on a board.

To go off at a tangent for a moment, because my next post will be on the microscopy of feathers, the albatross has a name that comes to us from Portuguese, where it is alcatras, and while the vowel change to alcatros would be understandable, the changing of the third letter is most unusual.  Most probably, somebody decided that the albatross, being a white bird, should be given a name containing alba, the Latin word for 'white'.

I use my tablet to add pictures to albums that are out there in the cloud, and the same Latin word that gives us the first part of albatross also appears in an album, which was once a blank tablet with nothing yet written on it, and so gave its name to the sort of blank book we use to stick in photographs or stamps (incidentally, many stamp collectors who care about their craft specialise in collecting forgeries, since imitation is the sincerest form of philately, but I digress).

See?  Nothing changes!  Now, where's that different drummer got to?


Friday, 30 December 2011

Making your own microscope

Robert Hooke's 1665 microscope only
had a single lens

If you do a web search on <USB microscope> (leave out the "angle brackets"), and dig around, you will find instructions for making a simple 'microscope' from a webcam that plugs into a computer. Be warned that you need to be fairly handy with tools and a soldering iron to try this sort of thing. You might be better off looking around for one of the cheap models that is available, like the one I showed a while back.

Remember that good work can be done with just a single lens. Anton van Leeuwenhoek did amazing work in the 1600s with single lenses, and the tradition continues. Try a web search on <water drop microscope> and discover some neat designs for one-lens microscopes. Or read this, which appeared first in Charles Dickens' Household Words and then was reprinted in Scientific American, November 4, 1854, p. 64. Maybe you can see how to make such a "microscope" yourself.
 There is a man who sometimes stands in Leicester square, London, who sells microscopes at one penny each. They are made of a common pill-box; the bottom taken out, and a piece of window glass substituted; a small hole is bored in the lid, and therein is placed, a lens, the whole apparatus being painted black.
Upon looking through one of these microscopes, I was surprised to find hundreds of creatures, apparently the size of earthworms, swimming about in all directions yet on the object glass nothing could be seen but the small speck of flour and water, conveyed there on the end of a lucifer match, from a common inkstand, which was nearly full of this vivified paste.
I bought several of these microscopes, determined to find out how all this could be done for a penny. An eminent microscopist examined them, and found that the magnifying power was 20 diameter. The cost of a lens made of glass of such power would be from 3s. to 4s. how, then, could the whole apparatus be made for a penny?
A penknife revealed the mystery. The pill-box was cut in two, and then it appeared that the lens was made of Canada balsam, a transparent gum. The balsam had been very cleverly dropped into the eye-hole of the pill-box. It then assumed the proper size and transparency of a well-ground lens. Our ingenious lens maker informed me that he had been selling these microscopes for fifteen years, and that he and his family conjointly made them. One child cut the pillbox, another the cap, another put them together, his wife painted them black, and he made the lens.
It all sounds too easy, doesn't it? I suspect the man in Leicester Square and his family may have had a great deal of practice!

Coming up early next year: looking at a feather and comparing sand samples from different sources. I have been distracted because I needed to buy an Android tablet for my writing work, and I have started playing with it in a serious way.  The writerly side of me may look at the many meanings of table and tablet at some stage.

Thursday, 22 December 2011

Closed for Christmas

That's it.  I'll be back around December 28.

I'll be off out in the bush, looking for beasties like this.

Go on, get away from the computer and get outside as well!

And seasonal greetings for whatever season you are currently choosing to celebrate.

Tuesday, 20 December 2011

A plankton net for collecting small animals

You can catch lots of interesting small water life by dragging a bucket on a rope though water weeds and then filtering the results.  A piece of ordinary denim makes an excellent filter, as you can learn if you Google <copepods denim cholera>.  Once you have filtered the water, wash your "catch" into a clear container and hold it up to the light.  use an eye dropper, a Pasteur pipette or a modified wash bottle to extract animals from the sample.

If there are no water weeds, you will need a net.  Even a home-made plankton net can sample small animals at or near the surface of the water.

The main parts are a towing line to pull the net along, a swivel at the net end of the line to stop the line kinking as the net spins while it is being pulled, a stiff hoop to hold the net open, a very fine net (think about what you have in the scraps basket at home), three lines attaching the hoop to the swivel and a small glass bottle which attaches to the lower end of the net, a metre or so beyond the towing ring.

You can buy a swivel from any fishing equipment shop. The hoop can be a length of coat hanger wire, bent in a circle, the mesh can be the footless leg of a stocking, either stitched or stapled over the hoop, or even glued to the hoop with contact adhesive (wear gloves and work outdoors to avoid the fumes if you use this glue). A stapled net won't last as long, but it's easier to make.

As you pull the net along, any animals trapped in the open mouth will be pushed down to the end, where they will be largely protected from damage by the still water in the glass bottle. You can buy nets like this for a high price, or you can make your own very cheaply.

The towing line can be a fishing line: I have used a fishing rod to haul a net like this through the water while walking along a wharf or jetty (the rod stops the net from snagging on the pilings), or you can tow one from a boat which is being pulled along by a 2 hp motor.

If possible, fix the bottle to the net by attaching a metal or plastic screw lid at the narrow end of the net, so you can change bottles regularly, just by unscrewing them. That lid will need a hole in it, but if you use a standard jar, you can have plenty of spare lids. Otherwise, tie string around the stocking and the bottle, and pull it very tight.

With a suitable net, you can explore the plankton types and densities over a time period: either looking for daily patterns, or monthly patterns (some plankton may respond to the full moon, so samples taken regularly at 9 pm could be useful). Maybe there are patterns you can see as the seasons change.

Nets like this can also be hauled through seaweed and water weed to sample the small animals living on those plants. This is likely to damage the net, so use a replaceable but strong one.

You could also just explore the types of plankton found in one place, or compare different environments at more or less the same time of day, over a period of time, to see whether any observed differences continue over long periods. Aside from that, you have the tool, you have some ways of using it, so go for it, remembering that the most interesting questions are always your own questions!

The origins of the towing net

Nobody knows now who was the first to develop this handy item. John Macgillivray, writing in the 1850s, thought it worth explaining how one was made, so maybe the idea was new back then:
Not having seen a description of this useful instrument, I may mention that the kind used by Mr. Huxley and myself, consisted of a bag of bunting (used for flags) two feet deep, the mouth of which is sewn round a wooden hoop fourteen inches in diameter; three pieces of cord, a foot and a half long, are secured to the hoop at equal intervals and have their ends tied together. When in use the net is towed astern, clear of the ship's wake, by a stout cord secured to one of the quarter-boats or held in the hand. The scope of line required is regulated by the speed of the vessel at the time, and the amount of strain caused by the partially submerged net.
—John Macgillivray, Narrative of the Voyage of H. M. S. Rattlesnake, vol. 1, chapter 1.
Or maybe it was only new to Macgillivray.  As early as 1768, Joseph Banks makes mention of using both a "cast net", and when that was lost overboard, he attached a hoop net to a fishing rod. Perhaps this was just dipped into the water, but the idea of towing a net seems obvious enough. Like a lot of simple ideas, most people probably thought it not worth mentioning or explaining!

Sunday, 18 December 2011

Slowing small water animals down

Well, as promised, here are some notes on getting to actually see live animals in a well slide like the one on the right. This is a standard glass microscope slide, 3" x 1" (75 x 25 mm), but with a small depression cut into it, so that a cover slip can lie flat on the slide, even when a large-ish (1 mm or so) animal is there is a wet mount.

The problem is that live animals swim around and go out of the field. They also go up and down and go out of focus.  That means you need to slow them down.

The three main ways of slowing animals down are:

* to put barriers in the way, so the animal can still move as fast, but not as far;

* putting the animal in a more viscous (sticky) solution which usually kills them in the end; or

* kill them outright.

The most common barriers are bits and pieces of cotton wool or ground-up face tissues. This is not very effective with anything smaller than a mosquito wriggler, but it's better than nothing.

Live specimens can be mounted successfully in ®Gurr's Water Mounting Medium, which slows them down (and kills them). I have been using the same bottle of this product for almost 40 years, and it seems to be hard to buy nowadays, though it is still mentioned by professional scientists.

A solution of 10 g of methyl cellulose in 90 mL water forms a syrup that will slow most animals down for microscopic examination, while allowing observation of movements of the gut, breathing tubes, and so on. You can buy methyl cellulose at hardware shops, though you may also get it at health food shops, where you will probably pay a lot more for it. Be careful not to get it in your eyes or on your skin.

I haven't tried this, but I'm told you can also add 2-3 grams of gelatin to 100 mL of cold water and heat this while stirring. Cool the gelatin solution back to room temperature and add one drop of pond water to one drop of gelatin solution.

If you mount the animals in 70% alcohol, this will kill them, but a 1% solution of magnesium sulfate (often sold as "Epsom salts") will just anaesthetise them. Note that 1% here means 1% by weight or one gram in 100 mL of water. Put a drop of this on the slide and then use a camel hair brush to add the animal.

Just a reminder for those coming in late: the material I am posting here is made up of out-takes from an upcoming book Australian Backyard Naturalist, due out in May 2012. This is the stuff that won't be there.

Next time, I will look at catching nematode worms.

Saturday, 17 December 2011

Small water animals

This entry is about the small crustaceans we call water fleas, because they are about the size of fleas, and they live in water.

Water fleas at a glance

These animals may be flea-sized, but they are actually crustaceans, distant relatives of crabs, prawns and slaters. The ones you are most likely to see are Daphnia, Cypris and Cyclops, but you never know your luck! They move differently, but you need at least a hand lens to see any details, and they are excellent for low-power microscopy.

Technically, they are all branchiopods (not to be confused with brachiopods!). Daphnia are in the sub-order Cladocera, the similar looking Cypris is in the Ostracoda, and Cyclops is in the Copepoda, so you may need to look up cladocerans, ostracods and copepods to find them on the web. The copepods are much less flea-like.

Branchiopds are easy to collect, because they will be found in most bodies of water, and they are just as easy to cultivate. They also have some interesting biology: the Cyclops that you see here is carrying two egg sacs, and you can often see eggs inside Daphnia.

I want to begin, though, with an odd discovery about branchiopods. It was made by Jacques Loeb, a German-born physiologist who moved to America. Loeb made some important discoveries on how animals respond to stimuli, and also did some useful work in embryology. He never explained how he made this discovery, but it must surely have been during a laboratory party!
The writer found that certain freshwater crustaceans, namely Californian species of Daphnia, copepods, and Gammarus when indifferent to light can be made intensely positively heliotropic by adding some acid to the fresh water, especially the weak acid CO2. When carbonated water (or beer) to the extent of about 5 c.c. or 10 c.c. is slowly and carefully added to 50 c.c. of fresh water containing these Daphnia, the animals will become intensely positive and will collect in a dense cluster on the window side of the dish. Stronger acids act in the same way but the animals are likely to die quickly. . . Alcohols act in the same way. In the case of Gammarus the positive heliotropism lasts only a few seconds, while in Daphnia it lasts from 10 to 50 minutes and can be renewed by the further careful addition of some CO2.
— Jacques Loeb, Forced Movements, Tropisms, & Animal Conduct, Dover edition of 1973, pp. 113–114.
In the passage above, 'heliotropism' means "moving towards the sun". People now prefer to say 'phototropism', meaning "moving towards the light", instead. Strictly, heliotropism means "moving towards or away from the light", which is why Loeb speaks of a "positive heliotropism” to show that the animals moved towards the light. Negative heliotropism would involve a movement away from the sun.

Today, we can see the logic of the animals' reaction: high CO2 means less oxygen, so moving towards the light usually means moving upwards and getting closer to the oxygen-rich surface layers of the water.

As a rule, when you are cultivating water animals in bottles, leave the water level far enough down to keep the surface area large. This maintains oxygen levels.  On the other hand, if you want to collect animals to look at, fill the bottle almost to the top, and within 24 hours, most of the small crustaceans will be in the top centimetre or so.

The tiny crustaceans (which is what they are) thrive wherever there is food, so green water from a pond will usually have some, but puddles, horse troughs (if they still have those where you live) and so on are also worth trying. Now for the rest of this, I am going to call them all Daphnia. At its simplest level, half-fill a bottle with green water, add a pinch of all-purpose fertiliser, cover it to stop mosquitoes getting in or water flowing out too messily if it tips over, and leave the bottle in the sun for a week or so.

The best bottles to use for this are 2-litre (or larger) PET plastic fruit-juice bottles, with the labels scrubbed off.  PET plastic is clear, so you will be able to see the animals if they are there. They show up best when you stand the bottle on a table in sunlight, crouch down and look towards the sun, especially near the top of the water and loom for small dots that are moving around near the surface.

As a general rule, that is all you need to do.  On the other hand, some professional biologists prefer to feed their Daphnia on small amounts of brewer's yeast, so the choice is yours. The golden rule is to have several cultures of anything precious, and to feed them at different times. That way, if the yeast takes over, you will have other cultures to fall back on, though usually, if a 'dead' culture is left for a while, there will be eggs, spores or survivors which will bounce back.

The best way to breed large numbers of Daphnia quickly is to take some water from a murky green aquarium, without any filamentous algae. Add a small amount of hard-boiled egg yolk, mixed with water into a sort of soup, and stand back! Any Daphnia that you picked up with the algae will start to breed very rapidly.

In stagnant water, Daphnia develop more haemoglobin, up to ten times as much as in water with plenty of oxygen, so the Daphnia from stagnant water can be quite pink in colour. See if you can observe this.

To look at these animals under the microscope, you need well slides, and you need some method of slowing the animals down, so they don't whizz out of sight.  I will talk about that next time.

Wednesday, 14 December 2011

Stains in microscopy

This is probably the most technical and difficult section in this blog (and also the least illustrated). If you are not planning to cut thin sections and stain them, skip over this.  If you persevere, pay close attention to the safety messages.

Most of the things inside a cell are transparent, so it is hard to see any detail. A dye that attaches to one kind of cell part makes it show up more clearly, and we call that dye a stain.

There is a catch, because dyes often cause difficulties with authorities like parents, landlords (or landladies) and the like. These stains can easily stain baths, basins, carpets. people and pets—among other things. More importantly, while pale and colourless chemicals can also be dangerous, you are usually wise to assume that coloured chemicals are always dangerous. Any chemical which attaches to a biological molecule inside a cell (as stains do) is likely to cause damage in the cells that are attacked. Treat all biological stains as dangerous, to be on the safe side.

That means you need to discover the MSDS, the Material Safety Data Sheet. These are easy to find on the web by searching on <(name of chemical) MSDS>. Some MSDS sheets are hard to understand, but the ones at http://msds.chem.ox.ac.uk/ are reliable and clear. Try searching <methyl cellulose MSDS> for practice.

We are forever learning new things, and while methylene blue is regarded as safe now, that may change. Read the MSDS first, before buying or using any stain! You also need to understand that an MSDS will spell out all the risks: read the MSDS sheets for table sugar (sucrose to chemists), water and table salt (sodium chloride), and you will see how complete and obsessively thorough they are!

To get more information on the web, I suggest a search such as <microscopy stains safe>. Just be careful about what you believe!!

Here are some stains that I regard as fairly safe. Even so, you should handle and mix any stains out of doors in good weather. If the stain comes as a powder, think safety first. When you take the lid off, there is sometimes a puff of dust that you don't want to breathe. Try to choose a day when there is no breeze: if there is a light breeze, stand upwind of the bottle. Never mix stains in high winds. Use gloves, goggles and a face mask, or if possible, buy the stains as solutions.

In this outline, I indicate the uses for which each stain is most often used, but most stains will work on other tissues as well.

Basic fuchsin: used to stain nuclei. Dissolve 0.1 gram of the powder in 150 mL of distilled water and add 1 mL of 70% ethanol.

Eosin Y: used to stain muscle fibres, cytoplasm and collagen. Dissolve 1 gram in 100 mL of tap water.

Methylene blue: used to stain living organisms. Dissolve 1 gram in 100 mL of distilled water and add 0.5 gram sodium chloride. This stain can be obtained as a solution from some pet shops, but it will need to be diluted and may have nasty additives. Remember that this one will stain sinks, basins, baths and toilets—and skin!

Nigrosine: used to stain bacterial spores and capsules. Dissolve 1 gram in 20 mL of water.

You can also experiment with food colourings. Many of these are now accused of being dangerous, even when they are approved for adding to food. Treat them carefully, just in case.

Iodine: this is not the friendliest of materials, but it's the best stain for starch in plant materials. Add iodine crystals to a saturated solution of potassium iodide in water until it is saturated, filter and dilute to a pale golden brown. Check to see if you can buy 'tincture of iodine' from your pharmacist, but it will be expensive, and these days, in Australia at least, you will probably only be able to get it from a specialist pharmacist called a compounding chemist.

Malachite green: is not so safe but it is useful to stain plant cytoplasm. Dissolve 1 gram in 100 mL of tap water. This is available as an anti-fungal solution from aquarium shops, but that solution usually contains formalin, which is really dangerous. Read the label first!

When you come down to it, the staining of thin sections might be Too Much Trouble, so what else can you do?

One easy observation involves the large cells that are found in a layer called the epidermis on a piece of onion.  I touched on that a while back in A bit more about microscopes and hand lenses — and I may get back to it at some stage.


Tuesday, 13 December 2011

Normal service will be recommenced shortly

I am on my way back home now, having been across the Tasman, playing with grandchildren, bashing through the very last check of Australian Backyard Naturalist, sent over the seas as a PDF, and in between times, gathering sand samples for further study for that microscopy project on sand.

Sunday, 4 December 2011

Using a pooter (or inhalator)

Just a quick one today, because I have been doing a lot of heavy data-shovelling for the gold book.

This is an old-style pooter, which you should avoid like the plague, because it is dangerous.

This dangerous and old-fashioned design used a glass jar, glass tubing and cork.  I was helping at a Cub camp one day, and my task was to look after a hyperactive kid and keep him interested for the day.  I showed him how to find small things and catch them with a glass pooter, and he was delighted.

That was fine—in fact it was in the specs I had been set for him to be delighted, but he set off, whooping and hollering, leaping over rocks with this glass jar and I just knew that he was going to fall and gash himself. He didn't, but I knew I had to do better.

A couple of weeks later, I was running a workshop for teachers at the Australian Museum. It was all about using scrap and junk to do real science, and I showed them where I was at. The second and third pictures show the solution,  My thanks to Carrie Bengston, who drew the third pic.

In a flash. one of the teachers suggested using a film canister for the job.  This was almost twenty years ago, and people used 35 mm film that came in canisters.  For years, I would go to my local photography shop and come home with plentiful supplies.

Digital photography killed the photography shop, and my supply dried up.  I needed a new design that used components that would be available for at least the foreseeable future.

Well, you can see me making (1) the film canister version; and (2) a newer version that is featured in Australian Backyard Naturalist, if you go to the video links given in the last paragraph.  There's nothing special about these designs (except that they work),  But it's how they work that counts. There are four absolute requirements:

(1) You must have a clear container, and
(2) You must have a lid that comes off easily, and
(3) There must be a cloth filter to stop wee beasties entering your throat, and
(4) There must be no breakable parts.

The two designs you see in the video meet all of those criteria. Look at the video, then come up with your own design.

The don'ts:

* Don't pooter up ants, because they make formic acid, which burns the throat;

* Don't pooter up stink bugs (think about it);

* Don't pooter up millipedes, because their secretions may be toxic; and

* Don't even try to pooter things that are bigger than the tube (think about that!).

To get some more information on making pooters, you need to look at a video on pooters that I made for the National Library of Australia.  I actually did three videos, which you can find from here.  (By the way, that was me before I found out that I was in reach of being overweight, and also that I had a genetic predisposition to diabetes.  I didn't need to be told twice, so I now cast a far smaller shadow.)


* * * * * * *
This blog covers quite a few different things, so I tag each post. I also blog about history, and I am currently writing a series of books called Not your usual... and the first two have been published by Five Mile Press, The offcuts appear here with the tag Not Your Usual... . For a taste of Australian tall tales, try the tags Speewah or Crooked Mick.   For a miscellany of oddities, try the tag temporary obsessions. And language us covered under the tags Descants and Curiosities, while stuff about small life is under Wee beasties.