Search This Blog

Monday, 9 April 2012

Storing dead specimens


There is a time and a place for taking animals, killing them and storing dead specimens, but as a rule, I think it's best to leave things where they are. I will find them, catch them if I really need to, but where possible, I try to let them go where I found them.

Flinders ranges dragon: note its camouflage.
I have a few dead animals in Australian Backyard Naturalist: one was a mummified lizard that I found in my garage; another was a freshly dead bandicoot which will appear in the next blog entry in a starring role.


Notice the pattern there: I collected them dead. There was also a huntsman that I found dead: I suspect that somebody had sprayed it, because it was freshly dead and undamaged.  I will come back to that in a moment.


Under normal circumstances, when I found a dragon like the one on the left, I would leave it where it was, photograph it (as I did), and walk off.

In this case, I was with a party in the Flinders Ranges who would be interested, and I needed a close-up shot taken it show how a lizard is held safely, gently and firmly (that's safe for the lizard: you can't see the tail in the lower shot, because it's being used to lash me!

Under normal circumstances, this next shot is far nicer than a dragon in a cage or in a pickling bottle!
One of our local water dragons in Sydney.
Would you believe that this was a dead cicada, found on a path?  Well it was!

There are times when it is right and proper to collect live specimens to kill and store for reference or study purposes. If you end up working in this area as an adult, then you will spend a great deal of time catching and preparing specimens. As a hobbyist like you, I urge you to just collect with care and thought. Here is what can happen when collectors go mad.
Hunting the last great auk
We know a great deal about the last of the great auks. These Icelandic sea birds were collected to death, so poor hunters could sell the bodies to rich "amateur" collectors. A set of islands called the Geirfuglasker Skerries, sank after volcanic activity in 1830. This left the auks with just a single home, the island of Eldey, off Iceland. The collectors kept collecting.
On June 3 1844, an expedition of 14 men sailed to Eldey. Sent by an Icelandic bird collector named Carl Siemsen and led by a Vilhjälmur Hakonarsson, they wanted to get specimens before the last auks died out.
Only three men actually landed on the island: Sigurör Islefsson, Ketil Ketilson and Jón Brandsson, and they only found two great auks. Both birds ran away, but slower than a man could walk. Jón cornered one of them and Sigurör trapped the other. Ketil walked back to the place where the birds had been, and found an auk egg, but it was broken, so he left it there.
The last great auks left Eldey dead. Vilhjälmur Hakonarsson went back in 1846 and again in 1860, but he saw no great auks on Eldey. A species had been snuffed out in the name, not of science, but to feed an amateur mania for unusual and rare specimens.
Sadly, I couldn't get an auk to come to the camera, but here are some puffins from Lunga in the Hebrides.
If you are collecting lots of moths or butterflies, you will need a relaxing jar, a spreading board, storage boxes and entomological pins, but I won't deal further with those here, because I have little experience with them. I can, however, discuss relaxing as I practised it on my dead huntsman spider.

When thing die, muscles tighten, the body contorts, and it generally ends up drying into a contorted shape. The spider was beginning to contort, so I put it in a jar that contained a wet tissue and a piece of aluminium foil. Sorry, I wasn't planning to write about this in the book, so I didn't photograph the jar.

Anyhow, the idea was to keep the spider in 100% humidity until it became loose, so I could then pin it into place on a piece of foam like this. None of the pins goes through the spider: they all just hold the limbs in place while it dries and "sets".

Notice how the pins support and constrain the limbs, so they dry and set in a like-like pose.
You can keep dead insects, pinned in drawers or boxes, but if you want to preserve them, you will need to seal the containers and keep some mothballs in there, or other insects will eat your prizes. Another possibility is to use a preservative solution.

The most common solution is 70% alcohol, a mix of 70 mL of alcohol (methylated spirits) and 30 mL of water (scale this up or down, keeping the proportions constant). Over time, some of the alcohol will evaporate, so if you need to keep your specimens for a long time, you need to pour off all the liquid and replace it every couple of years.

Some specimens slowly bleach over time in 70% alcohol, but I cannot say if this is caused by light or the fluid. One drawback with methylated spirits: it contains some poisons to stop people drinking it, and when you add water, it often goes cloudy for a while, but after a while, it goes clear again.

Photographs are probably a better way to record your finds. Just ask this centipede, which I brought inside and then released under its flower-pot where I found it.

Anybody who knows my Facebook page will recognise this beastie.


Sunday, 8 April 2012

Making a Secchi disc

Some years ago, I was researching a book on the way science changed in 1859, the year that Charles Darwin published On the Origin of Species.  In many ways, 1859 was an annus mirabilis, a year of miracles, and one of the threads I pursued was the matter of weather observation and weather forecasting.  This science had been gathering pace during the 1850s, and really came into its own around 1858–1860.

That was when I came across a well-known name, but in an unexpected context. First, I learned that the scientist I knew only as Secchi, who invented the Secchi disc, was Angelo Secchi, but more than that, he was Father Angelo Secchi.  He was a Jesuit priest who had been made director of the observatory at the Collegio Romano at the Vatican in 1849, after two years studying physics at Georgetown, Washington D.C.

By 1859, he had made the interesting observation that there were "atmospheric waves".  Think of the situation where a "high" moves.  It was this movement that Secchi said could be detected.  He added that these waves could travel from Rome to London in about 36 hours.

He is remembered today for suggesting the classification of stars by their spectra and for his Secchi disc, used to assess turbidity (if you like, you can say in water.  I have to confess that I knew him only for the Secchi disc.

Turbid water, muddy water, is a problem for living things.  Plants need light to grow, and all animals depend, directly or indirectly on plants for food.  The problem in the 19th century was to find a reliable way of comparing turbidity in water.

Creating a scale was too hard, but at least, with a Secchi disc, you can get a comparative measure of different turbidities.  One lot of water, you can still see the disc when it is three metres down, but in muddy water, the disc may disappear when it is only 10 or 20 cm below the surface.
The completed Secchi disc. home-made variety, Mark I and only.

The basic idea was to lower a standard object (the disc) into water until it just disappeared, note the depth at which the happened, using marks on the line with which it is being lowered.  Then as a control, the standard object is lowered further, and then hauled in until it is just visible.  Once again, the depth is measured, the two depths are averaged, and there is your turbidity measure.

There are a few catches there: you need to have shade over you to cut out dazzle that might make it hard to see the disc.  An umbrella is good for that: look to the right.

And in shallow water, you may need to use a mirror on a stick, like the illustration on the left-hand side.  Just improvise as you see fit!


People looking for science projects: think about comparing the animals and plants in turbid water and clear water. It won't be easy, but you will most certainly need a Secchi disc, and as they are hard to buy, it is easier to make one.

You need an old paint tin lid (or something similar), a drill, a ring-bolt, some string, and either a pen or some bits of cloth to mark the depths.

I made mine many years ago by drilling a hole in an old paint tin lid that I had painted white. I spray-painted two quarters of it black before drilling a hole in the middle before fitting a ring-bolt in place.
The red colour just happens to show
that the lid came from a 4-litre (or
1-gallon) paint tin. Only the black and
white pattern on the top matters.

While the official design (see the diagram on the left) has a dangling weight below the disc, I found that all I needed to do was put a couple of extra nuts on the base, and everything worked perfectly.  You can see those on the right.

Then I tied some reliable twine to it, with pieces of coloured rag tied into the line as reference markers, one at each metre from the surface of the disc. You can vary this design as you wish.


Wednesday, 4 April 2012

Watching seeds germinate


 Many seeds will germinate happily on moist cotton wool or a damp face tissue. Wheat, tomato and radish are good ones to try. As they grow, they can be observed under the low or high power of a binocular microscope.


The tissue stays damp longer in a Petri dish, so I have described using that, but you can always adapt the details, and sometimes I use a plastic berry box.

Fold a tissue in four, mark a circle with a pen and the base of the dish, then cut just inside the circle with scissors and put the tissue in the dish, add some water and seeds, and put the lid on. Then wait and watch.

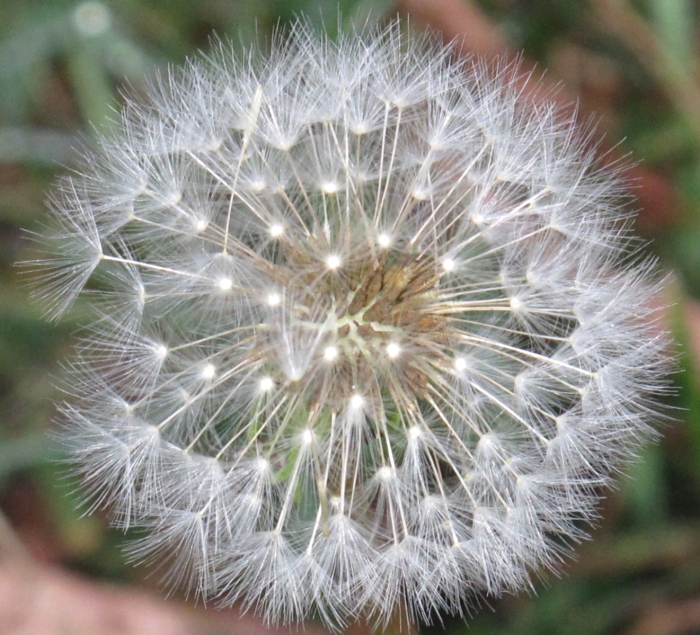
Dandelions also work, as you can see from the shot above and the two on either side.


Seeds will also germinate in water agar in a Petri dish: add 1.5 grams of agar-agar powder to 100 mL of water, boil it, and pour a layer about 6 mm deep into as many dishes as you can fill (you can always scale up the amounts, but the aim is always to have a 1.5% powder to water ratio).

Radish seeds can be pressed into the jelly, and if you seal the dish with tape (so it won't dry out) and stand it on edge, you can rotate the dish 90 degrees every few days, and see how the root always grows downwards.

Other seeds to use: most weeds including cobbler's pegs. Bidens sp., (weeds have to be good at germinating fast!), wheat, or make your own choice from the garden.

Bird seed from a pet shop (NO, bird seed DOES NOT produce birds!) is sometimes treated with radiation to stop the seeds sprouting, but you could also try that.

Because I was writing about these seedlings, I kept them on the window-sill in my study.  This has a north-facing (i.e., sunwards in Australia) aspect, and naturally, the seedlings grew towards the light.

Then I put a handy quartz pebble (in my house, there are always pebbles to be had) in the tub, to mark what had originally been the sunward side, and then I turned the tub around.

This took a couple of days to take effect, but you can see the result in the third shot, and now you can see why I needed the pebble in there as a marker.

While testing methods for the book, I tried using scented face tissues to germinate one batch of cobbler's peg seeds and I found that the seeds took longer on "eucalyptus and aloe" tissues than they did on paper towelling.

This is easy to explain if you know that eucalyptus oil can stop seeds germinating.

To test this, put some seeds on a wet wad of tissue in a saucer and add a second small container with a tissue and a few drops of eucalyptus oil. Set the saucer and the container in a plastic bag and seal it with a fair amount of air inside.

Suitable seeds to use for this include cucumber, radish, lettuce and white mustard. If they are commercial seeds sold for planting, they have may been treated with pesticides, so don't chew them. Take care not to get eucalyptus oil in your eyes, as it is quite painful. Use goggles to be on the safe side!

Then we took the plants section out, so here it is in the blog: over to you!


A few seeds are fussy and difficult. For example, some Australian bush plants only germinates after a fire, and it appears that the trigger is chemicals found in smoke, rather than the heat of the fire—or that was the official line last time somebody quoted it to me—this makes them sprout after a fire.  There could be a nice project hiding in there!

She-oaks (Allocasuarina), Banksia and Hakea are among the species that drop seeds from woody fruits, almost as soon as the fire has died out.  Some of the banksias and other plants have underground stems which are protected from the heat of the fire, and these send shoots up after a fire.  Gum trees survive by sending out new shoots from living tissue, deep beneath the bark.

* * * * * * *
This blog covers quite a few different things, so I tag each post. I also blog about history, and I am currently writing a series of books called Not your usual... and the first two have been accepted by Five Mile Press, The offcuts appear here with the tag Not Your Usual... . For a taste of Australian tall tales, try the tags Speewah or Crooked Mick.   For a miscellany of oddities, try the tag temporary obsessions. And language us covered under the tags Descants and Curiosities, while stuff about small life is under Wee beasties.


Tuesday, 3 April 2012

Le livre nouveau est arrivé (new book, for non-Francophones)

Sorry, if you don't get the reference, but outside wine merchants in certain areas, at the right time of  year, you can see signs, usually in French of some sort, proclaiming that the new Beaujolais has arrived.  Join the dots: Beaujolais is a wine.

Unlike Beaujolais, you can't drink it, but the new book is here.

Well, I've been talking about this book for long enough—in fact, it was two years ago today that I announced publicly that it would be happening.

Now I have a copy in my hands, and there will be copies out there in the bookshops, four weeks from now.

It's Australian Backyard Naturalist, if you hadn't already worked that much out, and the details from the distributor are here.

Regular blogging will continue shortly, once I catch my breath.

Incidentally, the careful observer may note that I have tagged this as "education".  As I have said elsewhere,  education, teaching, training, wisdom, knowledge, learning, understanding and erudition are not the same thing. If we target these with joy, enthusiasm and culture, we will have done a good thing.

This book is not educational in the barrenly offensive didactic style of Wackford Squeers and malignant rote-learning trainers, but it is about opening doors and new perspectives. I hope that it won't find a place in every desk in the classroom, but I hope that the ideas I offer will enliven the minds and hearts of enthusiastic and joyful collaborators in classrooms across the land. I want this book filched from, not pored over, analysed and studied!

Monday, 2 April 2012

The way seeds spread


Putting down roots is good for plants but having roots means that plants can't move around, to find new and better places to live. The successful plants are the ones with seeds that travel somehow.

I once worked in a lab during a hot Canberra summer and each afternoon, wattle seeds would bang against one of the windows as seed pods broke open in the hot sun, curling back suddenly, sending seeds flying, but none of the seeds would have gone more than six metres from the tree which was three metres from the window.

Other plants have seeds that 'fly' away from the tree. Australian she-oaks and hakeas have winged seeds, and so do pines, but none of these would get very far from the parent tree. Maybe they carry a little further when the wind blows, but dandelions have a better way. Each seed is like a small parachute, so that even if it lands, wind gusts may pick it up and carry it further along.


A prize of £40 (forty pounds) was paid to a Mr Thomas Woolley for introducing a "New Rare Plant", some time after 1849. He displayed his plants at the Australasian Botanic and Horticultural Society summer Exhibition in November 1850, so it may have been in 1850, but it could have been no later.
Public domain http://www.biolib.de/ 

Woolley's choice was the dandelion, regarded as a useful plant for treating many illnesses, including scurvy. By 1864, the dandelion's parachute seeds had spread it far and wide and it was no longer rare. In fact it was all around Sydney, "growing wild in the bush on the North Shore, both in flower and seed, and it is now growing wild and in great luxuriance about Braidwood", said a report of the happy Acclimatisation Society.


Bathurst burrs came from South America, either in contaminated seed or maybe on imported livestock. Plants were seen on the banks of the Nepean River, west of Sydney in the late 1830s and soon after, they crossed the Blue Mountains and got onto the Fish River, probably on horses' tails. An 1844 flood carried burrs down into the Macquarie River valley and after that the burr's clinging ability took it all over Australia.

Incidentally, and as a side issue, one of my hobbies is chasing down the earliest appearances of assorted Australian terms in print and recording these in a public database, and I recently added 'Bathurst burr' to the collection.
Three different magnifications of the barbs on a cobbler's peg seed.

It is called Early Australian instances of Australian language. It can also be accessed through a permanent tinyurl that is easier to recall: http://tinyurl.com/ozlingo

If you have ever walked across weedy ground, you have probably seen how 'cobbler's pegs' attach to your clothing, but take a closer look at one of these clinging seeds and you may be amazed. To get a range of seeds like that, go and roll in some grass, or drag an old woollen garment through some weeds or undergrowth and see what attaches itself.

Other seeds are sticky. The cassia (Senna pendula) is a common weed in bushland across Australia, and it spreads because its seeds get sticky when they are wet. I suspect that birds eat some of the seeds, but fly away with other seeds sticking to them, seeds that later dry and fall off.

Other plants have seeds that can survive being eaten by birds, and some of them even have fruits that are designed to help attract birds to get them to swallow the seeds. By the time the seed passes through the bird, it is going to drop out a long way from where it was swallowed.

Now see if you can work out what tricks evolution has played to spread the seeds in your garden.

Back from a bit of field work.

The other day, I finished the first draft of the book-after-next.  I have one coming out, four weeks today, another coming out in October, and then there may be a gap, because the next job is a big one.   As I have been hinting and sometimes saying for a couple of years, I got interested in the real price that we pay for gold: the societal price (in terms of upheavals and wars), the human price (slavery, disease, sometimes genocide) and above all, the environmental price.

It began in July 2007, when Gerry and Theta Brentnall took us up into the mountains to see the results of gold sluicing there, and told us about the court cases that resulted, cases which stopped sluicing, because of the environmental damage caused downstream.  That shot was taken in the Malakoff Diggins State Historic Park.

We never did that in Australia, I told them with a high degree of confidence. I said there probably wasn't enough water to use huge hoses to undermine cliffs, sending stuff tumbling down.  But when I realised there was a story to tell, I started to look into sluicing, found some hints, did some checking, and came away amazed.  We did it, sure enough!  But then I found out where this sort of thing happened first, when the Romans went to "ruin the mountain" near Las Medulas in Spain, which area I visited last June.


The name was coined by Pliny the Elder, who was Procurator in the area in 74 AD: "alio modo puteorum scrobibus effoditur aut in ruina montium quaeritur", he wrote.  What you see above is all that was left after a couple of centuries of breaking down a mountain and collecting about seven tons of gold a year, across that time.
This is scanned from a copyright-free source.
Here is an 1851/1852 image of gold mining in New South Wales. You can see where timber has been felled, up the hill on the right, there appears to be some erosion in the cliffs across to the left, but I assume that mud going into the river from cradles as people "washed for gold" would be the main issue. So, I thought the damage I would find in Australia would be far more minor, but luckily, I tackled it with an open mind.


That is why I didn't really expect anything like the arch you see above, which is in the Golden Gully, just outside Hill End, not that far from the Turon River.  It turns out that some diggers diverted water through a tunnel that has, bit-by-bit, collapsed until there is just this section left standing.

Somewhere along the way, I became aware of the Oriental Claims site near Omeo in Victoria, and we headed off there last Friday, driving 1584 km, just under 1000 miles, in 55 hours.


As at the Malakoff diggings, the idea was to carry water around mountains and hills in high channels, before the water was fed into iron pipes or toughened hoses that could withstand the pressure. The idea was to use high pressure water jets to loosen and erode paleogravels, washing them down to a point where the usual Long Tom style device could be used to take out the gold. There was a bit more to it than that, but that's a reasonable amount of free information: for the rest, buy the book!


And here is the sort of result you get.  You have now seen photos taken in Spain, California, Victoria and New South Wales: make of the common factors what you will.

Now here is some evidence:
The hydraulic system is another great improvement in mining. By means of hose, the force of one hundred and fifty to two hundred feet head of water is turned upon the hills, which in this way are dissolved and run through sluices, and thus diggings, which in the ordinary mode of mining would not pay the working, are made extremely profitable. The necessity of scientific explorations is felt by every practical miner. Frequently in running tunnels into the hills, the labour of months or years has been made unavailing through ignorance of the geology of the location. But when science is brought to aid labour, we shall bear no more of tunnels started too high or too low, and thus rendered useless.
  —  Empire (Sydney), Friday 2 March 1855, 5.

Somebody at the Empire cared about this method, because here is more, some three yeares later:
HYDRAULIC MINING.-It affords us rare pleasure (says the Mountain Messenger), at times, to stroll through the mines and see the gigantic operations which are there carried on to procure the precious metal. A few days ago we wended our way over fallen logs and down deep banks to where the workmen were piping down the high gravelly deposit into sluice boxes. The large hose was conducting about fifty inches of water, and as it escaped from the nozzle at the end, it sounded to us like the "rush of many waters," mentioned by St, John. A playful desire overcame us to use the hydraulic, and with the consent of a friend we stood for two mortal hours, pipe in hand, watching and sometimes retreating in hot haste from the gigantic masses which would come thundering down.
Oh! it was rare sport, and to a person who has never seen such or indulged in it, but little idea can be formed of the excitement attendant thereon. In hydraulic mining the mode adopted by the miners is to work from the bed-rock. A sufficient force of water is let on, and so soon as an excavation is made by its power, the bank commences crumbling piece by piece, as a sort of providential warning for those at work to get out of the way. A wise man will take tho necessary precautions and run, for there is no tolling the extent of the cave, or where it is going to spread to; but we are sorry to say this is not always the case.
  — Empire, Tuesday 27 July 1858, 6.
On the way back, we stopped in at chintzy Yackandandah, capital city of the Land of the Twee, and the retirement home of Mr. Hedley, the despoiler of Pink Cliffs, who features in the book, but there was not trace left there of him.  Nor was there any trace of William Howitt, a literary gold miner who write from "Yackandanda" in 1852:
We have begun to destroy the beauty of this creek. It will no longer run clear between its banks... We diggers are horribly destructive of the picturesque. 
  —  William Howitt, Land, Labor and Gold, volume I. Boston: Ticknor and Fields, 1855, 219. (That is the edition available through Google Books.  As the English edition probably has different pagination, this is at the head of Letter XIII, written from Yackandanda, February 28, 1853.) 
That's enough on gold.  I will revert to natural history, once I have finished with my notes and photographs.


Thursday, 29 March 2012

A garden in a bottle part 2

This is the jar I used. It stands 30 cm tall.
This follows on from A garden in a bottle part 1, and you should probably read that first.


Now you are ready to start planting. For your first attempt, use a jar with a wide mouth, like the one shown in Part 1. This is because because some of your plant choices won't work, and you need to learn to work at a distance.

In time, you will be able to use a bottle with a tiny opening, but for now, you will really appreciate being able to get your hand inside.

All the same, the time has come to learn the craft. For tools, you need a piece of iron wire, long enough to reach the potting mix, a stick to use as a spade, also long enough to reach, and a paper funnel to help you drop seeds where you want them.

You will also need a long cutting tool to shape the plants in your bottle garden. A razor blade, glued to a long stick will do, but a "box cutter" blade, attached with screws, is the best design.

I used a stick rather longer than the jar, about 50 cm, but I later shortened it to about 40 cm.

The blades I use have a hole in them as they come out of the packet, and I use a screw through that to hold the blade in place, while the other two screws hold it steady.

What words are needed? Just follow the pictures! A word of advice, thought: these things can be lethal, so you need to be careful where you leave this, and how you wave it around.  Keep it away from pets and small children.


Once you have cut bits off a plant, you need to grab them and drag them out, so now we will make a plant gripper.

You need a stick Once again, I used a piece of timmer that was too long and later trimmed it.


You also need an ordinary spring clothes peg, two screws, and a length of fishing line (plus a drill, a safe bench space to work on (not the best dining table!!!) and two small screws.


The first step is to pull the clothes peg apart like this, then get the drill.


Notice in this next shot how there are now three holes in the peg: two for screws and one for the fishing line.  Notice also the matching holes in the stick.

The irregular middle hole came about because I was clumsy with the drill, but it turned out not to be needed anyhow.


Nest step: attach the half peg to the stick.


I started drilling one hole in the other half to attach the fishing line (see above), but in the end, I had trouble getting the fishing line to stop slipping, so I drilled a series of holes (see below).


 Then I wound the fishing line through the holes until frictional forces stopped the line slipping.


Then I fitted the two halves of the peg together (see above), and discovered that my design didn't work. So I drilled a new hole, behind the peg, and now it worked:


Well this is my prototype, so see if you can do better!

Planting

You can add some moss, choosing small pieces, dropping them down the paper funnel and tamping them into the potting mix with the wire. For plants, visit the garden centre and choose some tiny 'ground cover' or 'border' plants, or hunt around for some of the small weeds that grow in your garden. For flower seeds, ask about snowdrops, forget-me-nots, Livingstone daisy, Impatiens, Zebrina or Tradescantia. You can also add mosses, liverworts and small ferns.


No room for a bottle? No seeds? Try this: the tops of carrots will sprout and grow if you give them a chance, as you can see here.

To get more ideas for plants, perform a web search on <terrarium plants>. Or you could just make a terrarium.

I am now about to be busy for a few days doing field work, but when I get back, I need to say something about growing ferns from spores.

Now just to finish off, the work described and shown here was originally written as part of a book that comes out on May 1, called Australian Backyard Naturalist, and it got left out on account of a lack of space.


A secret: books like that take as long in gestation as a baby elephant, and the steps shown in this blog were carried out more than two years ago.

Yesterday, I took my garden in a bottle, now more than two years old, took off the lid, and took a shot down into the jar to show the fishbone fern I had planted in it, and then ignored for two years.

This is it!

So as you can see, this sort of setup is seriously low maintenance!


Wednesday, 28 March 2012

A garden in a bottle part 1


Wardian case: Wikipedia image.

I plan to do this in two parts, with the art of planting and the making of tools next time. Right now, I am flat out finishing a book, so Part 2 may be a few days away.  Amuse yourself getting together the stuff you need, and planning where to put the finished product.

It's amazing what will grow in captivity if you give it a chance. In the middle of the 19th century, the Wardian case, a sealed case with glass panels, became popular as a sort of mini-greenhouse. It gave immigrants to Australia a way of carrying plants and soil from Europe to Australia, and pests were often carried along as well.


This is what you need:jar, gravel and peat moss.
Forget the tools, they will be covered in Part 2.
Wardian cases were first used in 1833 when a ship carried British ferns and plants to Sydney, where they were no doubt unloaded and set loose in the colony. The case was certainly refilled with Australian plants and sent back to England. In 1841, New Zealand plants travelled to England in a Wardian case. Another case was used to smuggle tea plants from Shanghai in China to India. Later, rubber seedlings, germinated from smuggled Brazilian seeds, were carried in Wardian cases to Malaya and Ceylon (now Malaysia and Sri Lanka).

 Once sealed, there is little water loss from a Wardian case as most of the evaporated water condenses and runs back to the bottom of the container. So long as the case gets enough light, the plants will do well. On ocean voyages, the main benefit was that the plants were protected from salt spray, strong winds and extreme cold.

First, add the gravel.
These conditions are not found in most homes, but it's easy to forget to water house plants, so a sealed environment makes a good garden. You can use a bottle or a fish tank just as effectively as a case, so long as it is sealed, so long as the sides are clear glass or polycarbonate sheeting and so long as the plants get enough indirect daylight. If there's enough light to read by, there should be enough light for the plants.

Any clear bottle will do, although 3 litre PET bottles seem to be about the best available these days, now wine flagons are a thing of the past. When you have mastered the art of planting in bottles, look around gift shops for fancy bottles to plant a really fine garden in.

You can get bags of clean gravel at aquarium shops.

Peat moss is sold at gardening shops.  You don't need much so you may be able to persuade a neighbouring or family gardener to make a small donation.
Then add some peat moss and tamp it down.

Notice how I chose a jar large enough to get my hand in (and out), with a good seal as my practice jar to learn on.


You will need some water in the very bottom, but most plant roots can't survive being surrounded by water, so you need 2–3 cm of gravel at the bottom of the bottle.

Use fine gravel, the sort that is sold in aquarium shops, then cover that with about 3 cm of potting mix. Make the surface level (or sloping like the terrarium), and add water gently to avoid washing the potting mix away. Use a funnel and plastic tubing if you can. Add water until there is visible water among the stones.


You need to add the water gently. I use a squeezable plastic water bottle, the sort that has a 'pop top' on it for this purpose.


And here's what it should look like. If you look very carefully, you can see how far up the gravel is saturated: notice how the top, dry half of the gravel looks lighter.


Next time, I will have something to say about what to plant and how to make some gardening tools. They aren't so necessary for a jar like this, but they can be if you really want a garden in a bottle!

Thursday, 22 March 2012

Setting up a terrarium


A terrarium is a good way to grow small plants in a confined space—but it can also be much more. This is another bit that was cut from Australian Backyard Naturalist, mainly on account of space.  So here it is, for free!
How to convert a simple fish tank to a terrarium. You can cover it
with glass or plastic, cling-wrap or flywire. This illustration came 
from a 1976 book of mine, called Exploring the Environment.
No copyright is claimed: consider it as public domain, though an
acknowledgement would be appreciated. 

For a good terrarium, you need an old fish tank which does not leak, gravel (you can buy it by the bag in aquarium shops, and tthe next entry will show you how to use what is left-over), washed coarse sand, a few stones and pebbles and some plants that do well in moist conditions.

If you can get one, use a daylight electric light (you can get them at aquarium shops) or place the tank on a window sill near (but not in) sunlight. If you can't arrange that, choose shade plants.

Put a sloping layer of gravel in the tank, 2 cm deep at one end, with no gravel in the last 10 cm: this is where there will be a water pool. Then add sand over the gravel to make a 10° or 15° slope along the length of the tank (you can leave out the gravel, if the sand is coarse-grained). Once again, leave one end free for a pool. Pack the sand down as you add it and water it gently: the excess water will run down and pool at the low end. You can grow duckweed and algae on and in the water.

Then plant mosses, bryophytes, Selaginella (club moss), weedy things and small ferns, up and down the slope, and maintain the water level. Collect small samples of moss when you are out and about, dividing each piece into three parts to place on the slope at different levels so they can thrive in the best environment. Use small plants: I like to add the odd small fern and small weedy-looking shade plants. Violets do well.

Add a few river pebbles as part of the dry surface to provide more niches. A piece of granite is good on the water's edge, because mosses and algae can grow up it. After that, just keep adding bits and pieces and ripping out any plant that gets out of control.

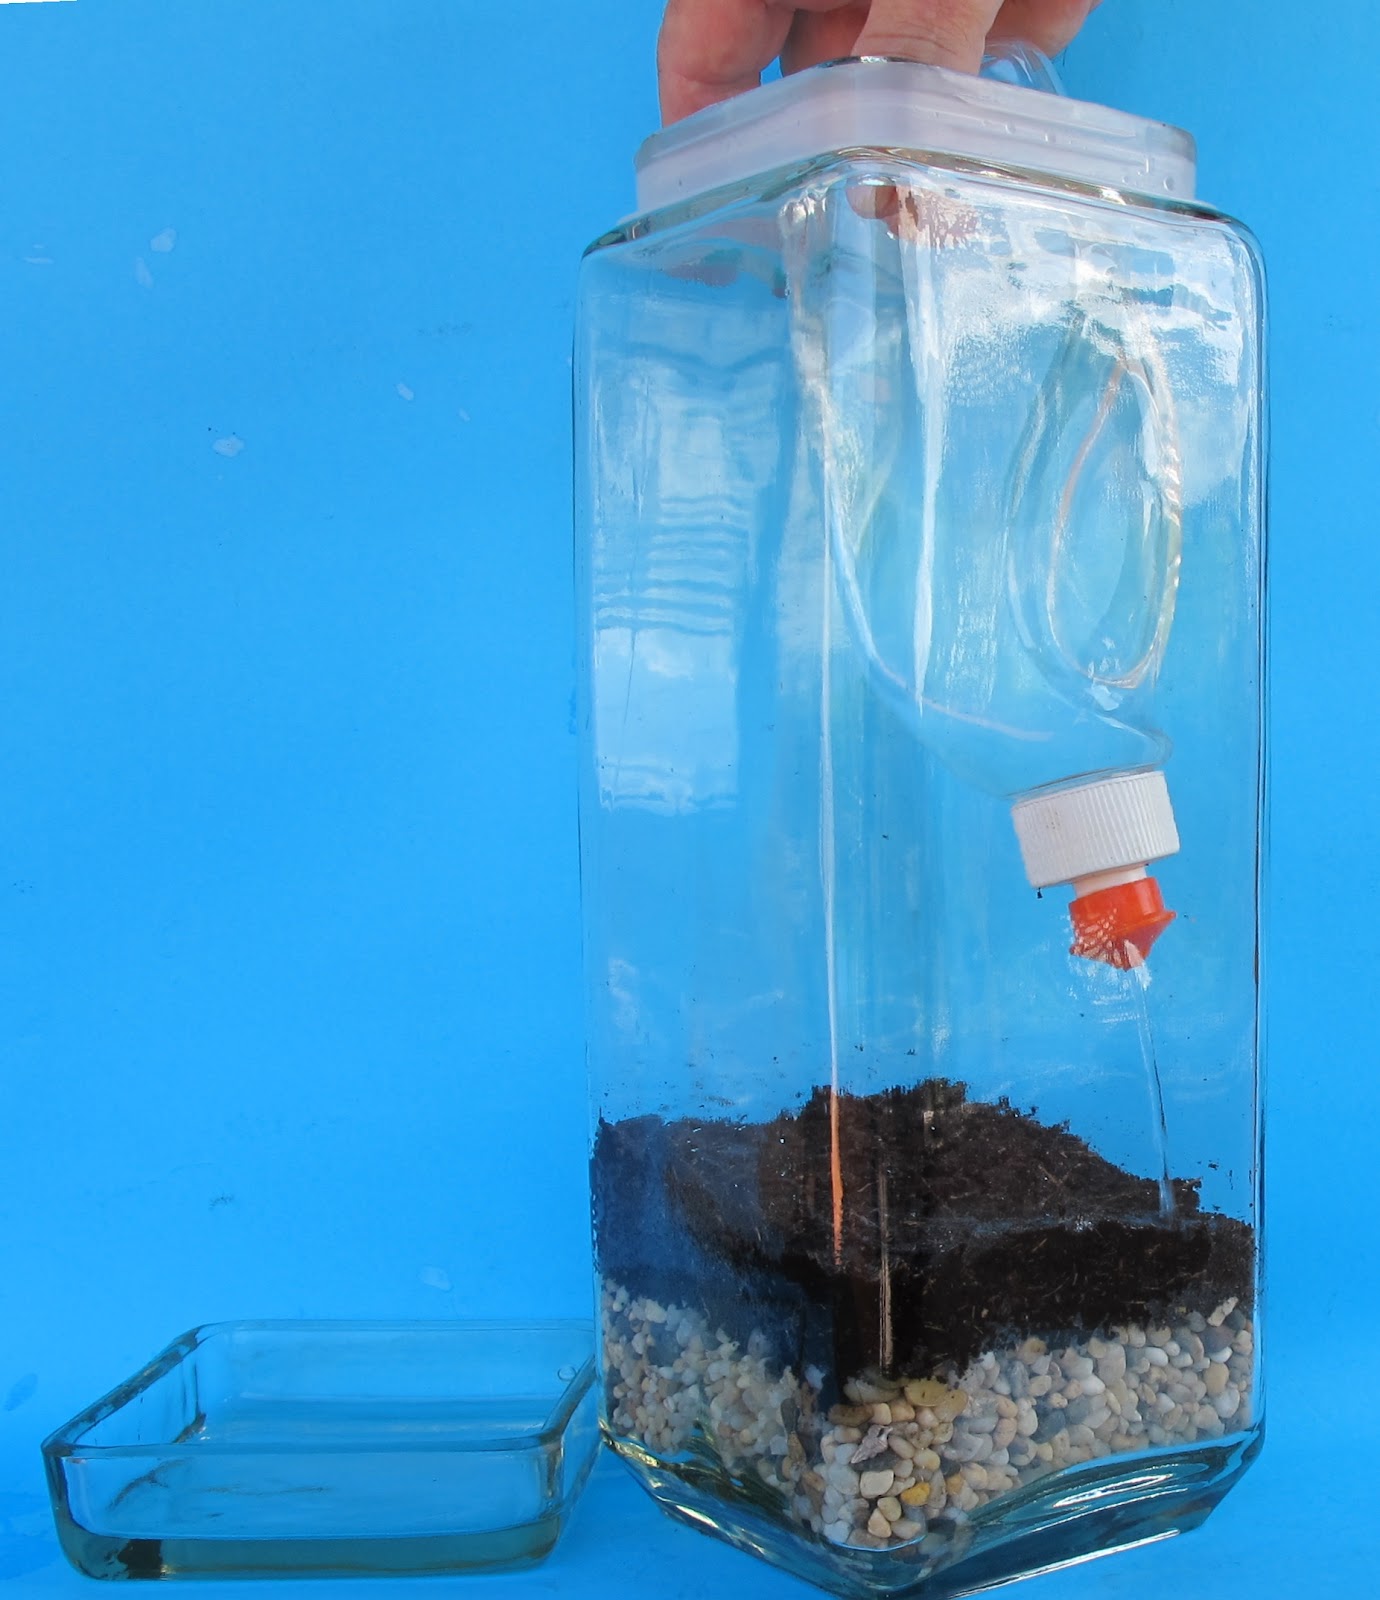
You can water the system by leaving an upside down soft drink bottle sitting on a rock at the lower end. This keeps the water level constant over a long period of time, which is very useful during holidays. If you will be away for a long time, you will probably want to cover the tank in cling wrap as well. From my tests, a one-litre bottle is good for a fortnight in hot weather with a flywire cover.

Occasionally, water gently up and down the slope with a watering can to maintain a bit of variety, and to help the mosses and ferns which need free water to breed. You can also spray the surface with a wash bottle, splashing water through the flywire to make "rain".

My terrarium used to double as a guest house and recovery room for semi-drowned frogs from our pool, so it was covered in flywire to keep the humidity down, and there was a small hole in the flywire at one end. The upper half of a funnel cut from a soft-drink bottle went through this hole. I would put a piece of fly wire and leaf litter in this funnel. As it dried, the smaller animals just migrated down and fell into the tank.

If the arthropod population blew out and there were no frogs in residence, I would send in a few spiders to clean up. The best spider is the household "Daddy Long Legs" spider. I tried a centipede for a while, but it did not do much. It survived, so if you want to keep centipedes, there's a hint for you.

The flywire stayed on under the weight of the funnel, as I always shape my flywire covers like the lid of a shoe box and then "stitch" them into that form with a stapler or copper wire—you just lift the lid off when you want to garden, or add some new bits of moss, fern or whatever. The flywire also keeps the spiders in and the mossies out.

I keep another source for water for the pool in the terrarium tank. I always have a few two litre apple juice bottles with a pinch of commercial "plant food", inorganic fertiliser, in each of them, with duck weed, algae and the occasional dead leaf from a nearby creek to add more life.

These bottles are kept about two-thirds full, allowing the water to "breathe" through a larger area and I keep a spare bottle with just tap water in it, water that is "ageing". Time taken each week? About two minutes, plus the messing-around time when I bring samples home, maybe five minutes a week in all. But I spend much longer just looking . . .

* * * * * * *
This blog covers quite a few different things, so I tag each post. I also blog about history, and I am currently writing a series of books called Not your usual... and the first two have been accepted by Five Mile Press, The offcuts appear here with the tag Not Your Usual... . For a taste of Australian tall tales, try the tags Speewah or Crooked Mick.   For a miscellany of oddities, try the tag temporary obsessions. And language us covered under the tags Descants and Curiosities, while stuff about small life is under Wee beasties.


Sunday, 18 March 2012

Moss capsules and their spores


Moss mat with spore capsules sticking up above.
Sometimes when you look closely at a moss, instead of the usual velvety green, you can see little stalks poking up with what look like wind socks or tiny turnips on the end.

These are called capsules or sporangia, and they release spores. Each sporangium has a neat structure called the peristome teeth that it uses to push out spores when the air is damp and humid.

My camera skills are not as advanced as they might be, but I managed to crop out the capsule on the right.  For scale, the whole is about 3 mm long.

I have never been able to grow mosses from spores successfully, though mosses seem to do it all the time, producing spores and releasing them into the wind.

On the other hand, I have been able to establish successful plantations of mosses on the sloping sandy surface of a terrarium tank. I just take a small sample of a moss, break it into several even smaller parts, and embed each at a different level down the slope. After that, it's up to the mosses to slug it out in the best Darwinian way.

Growing mosses on rocks
I haven't tried this method because we don't have a blender that works, and my wife says that even if we did, it probably wouldn't work after I tried this (she said this not long after I dried the sand for my angle of rest measurer in the microwave and got sand all over the 'roof' inside—you can see the result of my work, though not the messy microwave, in http://oldblockwriter.blogspot.com.au/2012/02/ant-lions-and-angle-of-rest.html). So while I was writing the book, I am keeping an eye out for a cheap blender in an op shop. So far, no good, and in the end, it went in the discard pile, as there was just too much stuff in the book, but it's worth trying.

Most moss-growing seems to be done by obsessive gardeners who want an antique look on statues or stonework.  Other obsessive gardeners spend all their time trying to wipe out the mosses in their gardens, so it takes all kinds and all that.

Anyhow, the experts say to take some healthy moss and crumble it into your blender. Then add 2 cups of buttermilk and 2 cups of water and blend at the lowest speed until it is completely mixed. It needs to have the consistency of a thin milk shake, so add more water if necessary. Then paint this slurry on rocks, pots or statuary, or just pour it on the ground where you want moss to grow.

Other writers say you can replace the buttermilk with a can of light beer and a half teaspoon of sugar. Another recipe that I found calls for about 2 cups of yogurt, and about 4 ounces of potter's clay to make the moss mixture stick better to the rocks.

The experts also recommend regular 'misting' of the stones. I know that if I find a cheap blender, I will be getting rid of most of the soil from the moss sample by washing it first.

In my next entry, I will talk about something I have done, and which also got cut from the book, but before I got around to taking any photos of fern cultivation.  So I'll tell you about the methods instead.

Finally, here's a shot to show a bit of the set-up I used for the moss shots:

I lifted a small clump of moss and placed it on one of my collecting containers, on a wall. Then, with a dark folder behind it and bright sunlight on it, I took a series of shots with a tripod mounted camera. One thing I miss with modern digital cameras is that you can't use a mechanical cable-release to reduce camera shake.  I have my camera set to take four photos after a time-delay of ten seconds, but because of the mix of light and dark, I mess with the f stops a bit, and delete what I don't need