Search This Blog

Showing posts with label The Microscopist's Mate. Show all posts

Wednesday, 30 October 2019

Ladybird week

This is a piece which will find its way into a book that is just about ready to offer to publishers, under the working title Looking at Small Things.

The book has its roots in a time, 68 years ago, when my profoundly unscientific parents bought me a toy microscope, made of Bakelite, with plastic lenses. I was entranced, but I could find very little to look at, though I did find a ferocious-looking beast on a Dahlia.

Somehow, I managed to learn that this was the larva of a ladybird, but as I could learn no more, and found no more exciting animals in the garden, so I moved onto other things, but a couple of weeks back, they were in my garden again, and I showed them to my twin granddaughters, but it took me a few days to recall what they were.

Over the years, a number of my books have been about finding interesting things to look at, how to catch them, how to keep them safely (for both the keeper and the keepee). I do this, because I had zero support or encouragement, and that simply wasn't right. To give my father some credit, he once showed me an adult cicada emerging from the pupa case, but there was precious little engagement of showing how involved.

My books, like Exploring the Environment and Australian Backyard Naturalist (both out of print, but try libraries) are designed to give adult guides and independent readers the ways and means to do that.

Now, close to ten times my age then, I had an approach from a start-up at Flinders University who had deduced  that I was interested in stuff like that. The upshot was that I told them I would write a guide for them as a pro bono, keeping the rights to any ensuing book. They make a very neat little gadget that clips onto phones and tablets. It is better used on really tiny things, but the second shot above was taken with it.

You can download a free version of a draft of my new book for free, using this link, but it is slanted towards teachers, and is targeted at helping them make sense of the kludgey and totally inadequate "National Science Curriculum".  When the greatly revised  Looking at Small Things comes out, it will be far more child-friendly.


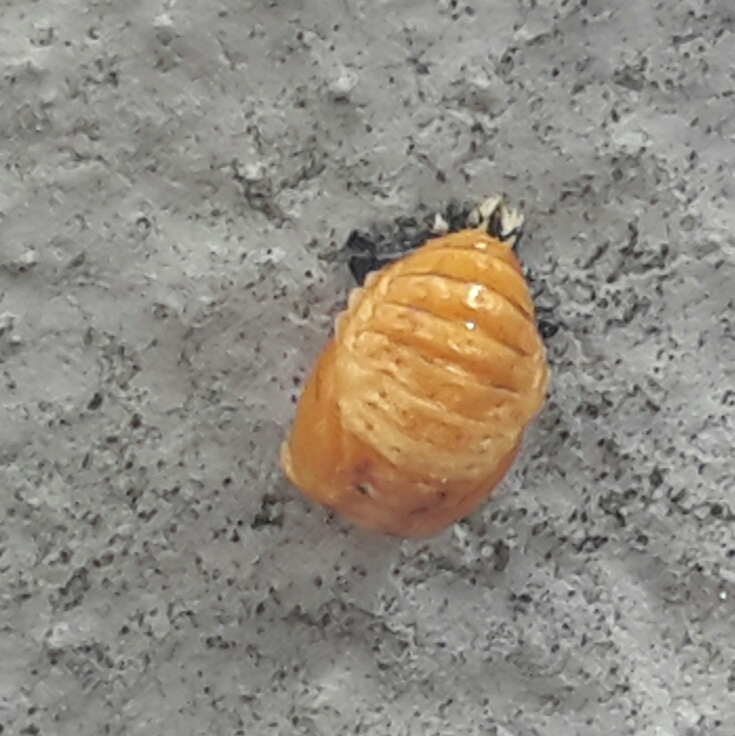
Anyhow, back to my story: the ladybird larvae were everywhere. But then, I notice something: they were starting to pupate on the walls of our courtyard.

At first, I was a bit slow to catch on, but they kept coming in waves, so I got the whole life cycle thing. Here, you can see a number of steps along the way.


In the end, they emerged as adults. Knowing what to look for, maybe you can find these (or similar) beasties for yourself. To get a handle on the scale, the larvae were about 8 mm long, and the beetles below were about 4 mm from side to side.


Friday, 10 August 2018

I have been busy (again!)

Somewhat predictably, but a bit earlier than I expected, the National Library of Australia has decided to publish a fourth edition of The Big Book of Australian History. (By the way, I notice that this link was out of date, so I have updated it: you may need to refresh the page, if it doesn't show the four editions at the start.)

The third edition weighs 1.1 kg, so it is, indeed, big. It contains 90,000 words in 120 articles, covering the key points in the continent's history, from pre-Gondwana onwards: I don't accept that Australia began in 1788.

It comes right up to present day, so I now need to fit in same sex marriage legislation, the Uluru Statement, and keep an eye out in case the Korean War is finally officially closed. I have to get the changes in Prime Minister in, trends in The Yarts, stuff like that.

Meanwhile Australian Backyard Earth Scientist and I note that this was another link in need of updating, so I did that as well. Don't forget to refresh, if you don't see an ISBN.

Another book that has been a little troublesome has been through the editor, but it has yet to get an imprimatur, so I will hold back on saying more just yet. I think it will be useful.

One good thing I have done this year is Going Micro. This is a pro bono work that I did for the people in Adelaide who are behind the excellent Go Micro, a clip-on low-power microscope that works with tablets and smart phones.

If you click on that link, you can get a free copy in PDF format. I retain the copyright in the text, and therein lies my current project. I don't have a publisher yet, but its working title is Looking at Small Things, and it uses the text that was written for Going Micro, but the tools to be used now are hand-lens, clip-on and full-on microscope. Right now LaST is two-thirds complete


I might add that later this term, I will be doing master classes with Stage 3 students at my local school, using clip-ons and also microscopes through a USB camera.

Meanwhile, in parallel, Not Your Usual Rocks (70% complete), a giant history of science (mostly done) and a work currently called A Shore Companion (half-done) are pushing ahead, though the last two may be sidelined for a fun work loosely based on my Science Playwiths website. That is scoped, and most of the text is there.

Why do I have so many things on the go?  Putting it simply, there's no writer's block in this house: I just switch to the next title. To be honest, I think that if I were at school today, I would be diagnosed ADHD.  This is why I don't damn kids who jump from idea to idea: we ADHD people just have superior brains, and can do several things at once.

The best computers use parallel processors, the best minds are capable of multi-tasking, but developing minds are slammed with the libellous label:

ADHD

Another reason: as I approach advanced middle age, I need to ask myself: if I cark it, which works would I be most annoyed having not finished?

In the middle of the night, the answer that comes back is all of them? so I suppose I should get on with it.

Sunday, 13 May 2018

The Microscopist's mate, part 8 of many.


Just for the record, all of what you find here, and in the other blogs in this series, is now available in fuller detail in my e-book Looking at Small Things.  Go to this link to find out more about how to get the free low-resolution copy, or the cheap high-resolution version: I'm a professional writer, so I like selling books, but I'm also a professional educator, so I like sharing ideas.

There's a similar free or cheap deal on offer for my Playwiths ebook as well, and to see what else I have been doing (LOTS!), go to this link.

You know what they say about ducks, calm, serene and quiet on the surface, paddling like #**@!^ underneath?

Well, that's been me, over the past fortnight, but it's all been worth it.

In one direction, I have just finished going through the the design draft of Australian Backyard Earth Scientist.

Thanks to Jo Karmel's patient editing and Stan Lamond's meticulous design, it now looks and quacks like a book. Or a duck. The bird above, by the way has a name, but  I use the name as my alter ego in another place, so I'm not telling! (What I will tell, is that the National Library of Australia will publish in in January 2019.)  The picture above indicates the likely appearance of the cover, but no guarantees, OK?


But wait, there's more! I have finally worked my way to the end of a guide for K-6 teachers on introducing the gentle art of microscopy in a simple way to young people. You can find it as a PDF by clicking on this link.

Basically, I have looked at all the exciting things you can do with a clip-on magnifier and a device (phone or tablet) to photograph small things. I matched each of these activities to the sloppily drafted pious hopes that make up the National Curriculum.

All of the images (except the one showing the gadget, above) were taken with the Go Micro, and the circle you see is a 9 mm field that you get on a device with no digital zoom.

I did this work as a pro bono for the people who are marketing these Go Micro gadgets: they are a start-up, based on Flinders University. In case you don't know, pro bono is Latin for posh people. As I said, a couple of years back, Latin is a very useful language, at times. Excreta tauri cerbrum vincit.

Back to garnering images, I care about this project because one way into the sciences is by the study of nature, which has absolutely nothing to do with the rubbish my cohort was subjected to in Year 6 under the name "nature study", work that I suspect was mandated by a po-faced and unadventurous pile of stodge, splendiferised by the cognomen 'curriculum'.

No, I want adventures, and here's one I haven't written yet. It is based on the 'skin' or exoskeleton of a huntsman spider, left in my garage after it moulted.

Now huntsman spiders are hard to photograph, because they run around, so I wondered what I could see, and after I looked and found things like the long face on the left, I called this adventure

...do spiders have eyelashes?
First off, I shared one of the images with my older grandchildren, who are 9 and 11, and used to grandpa's odd friends. I headed it: 'A really GRUESOME spider?'

This is really a harmless Australian spider called a huntsman. The circle you see there is about 9 mm across, so it's fairly big.

Well, to be precise, it's only the skin of one. When insects and crabs and spiders and things need to grow, they burst out of their skin. When they do that, there's a soft skin underneath, and they push that soft skin out before it hardens. We call this moulting, but don't worry about that name so much.  The important thing is that the skin sits still for photos.

In the picture, you can see the transparent skin that covered the eyes, lots of whiskers, and also the fangs, which curve around too much for them to be able to bite us. 


I hope you two like it, because at least one species of Australian huntsman spiders is now living in New Zealand.  If you ever watch the movie 'Arachnophobia', you will see the NZ spiders.

Why? Well, it seems the ones that survived in NZ had a "communal habit", meaning they lived together as a group, while the Australian ones prefer to be alone.  If you want mobs of spiders to move together, the New Zealand ones were the best ones to use.


Now, back to my question about the the eyelashes. Today, I started getting adventurous, zooming in by using the built-in digital zoom that comes with most devices, which means losing a bit of clarity.

Still, the bristles that were hard to spot in the first image are now fairly clear.


Here, we can see four of the eyes, but I wasn't finished yet. I zoomed in again, and blow me down, don't those whiskery things look more than a bit like eyelashes?

They aren't eyelashes, of course, but things like that must have evolved for some good reason, and doesn't that look like a nice little question to debate?

Or maybe it sounds more like a future Ph. D. topic? From little things, big things grow, and if those questions have already been solved, there are other huntsman bits to be investigated, like these shots of a palp and some gleaming fangs:


And because the source was a sloughed-off skin, no animals were harmed!

Now back to fitting things to the curriculum, anybody who has seen me in a workshop will know my on-man dialogue:

Me 1: But where dos this fit in the curriculum?

Me 2: In the slot marked Wonder...

Me 1: But there isn't and slot marked Wonder...

Me 2: (grinning wickedly): Then make one!

Oh the things we can think...if we're allowed to.


Wednesday, 2 May 2018

The Microscopist's mate, part 7 of many.


Just for the record, all of what you find here, and in the other blogs in this series, is now available in fuller detail in my e-book Looking at Small Things.  Go to this link to find out more about how to get the free low-resolution copy, or the cheap high-resolution version: I'm a professional writer, so I like selling books, but I'm also a professional educator, so I like sharing ideas.

There's a similar free or cheap deal on offer for my Playwiths ebook as well, and to see what else I have been doing (LOTS!), go to this link.

Announcing: some serious progress!

Links to previous parts: Part 1Part 2,  Part 3Part 4Part 5 and Part 6.

The drought has been due to the fact that I have been producing this guide for teachers, as a pro bono job.

I will, as indicated previously, be expanding this into a book on the arts of microscopy.

You can now see the fruits of my labours, though if you have read the previous six parts, you will have seen some of that already. Anyhow, we have released a draft document: Go Micro: Foundation to Stage 3.

This links interesting activities to the National Curriculum in Science, though there is one to the Maths curriculum as well.

I am an opinionated old secondary (and occasionally tertiary) teacher of matters biological, though when people asked me what I taught, my answer was always a bright "children!".

Over the years, I acquired a healthy distrust of theory, even as I was completing a Master's degree in Education. This work concentrated on measurement, evaluation and curriculum, and I still have a small private practice as a "fixer" of multiple-choice questions, here in NSW.

I became a bureaucrat, specialising in translating good theory into good practice, keeping the Head Office parasites away from the teachers, and that is still my position.

That is why I now, having acquired all of the papers I need to prove that I am retired, spend my time writing beautiful practical books for kids. Most of these relate to science, technology, Australia and history in various combinations.

I write for grownups as well, and I am a volunteer bush regenerator, doubling as the wrangler-of-first-resort for trapped possums, confused echidnas, snakes and redbacks. Venomous, sharp-toothed and spikeful animals are no threat to an old bureaucrat...

Clearly, my life lacks any real excitement, so I am also the 'visiting scientist' at a local primary school in a CSIRO volunteer program. My aim is to get my 500+ charges (Foundation to Year 6 in a bush setting) excited and inspired to go and look for themselves.

When an acquaintance told me about the Go Micro, I saw its possibilities right away, and started playing with the gadget, aided by two grandchildren. It worked, so I suggested using them in class to the primary teacher I work with, but a number of primary teachers advised me that they are required to link things to the National Curriculum.

For readers unfamiliar with the NC, here is a police artist's impression, prepared from the statements offered by the surviving victims.

Reminding the reader of my post-graduate qualifications in this area, the National Curriculum is, in my professional opinion, proof that a camel is a horse designed by a committee, the sort of committee that compares a camel with a horse by taking two camels and sawing the humps off one of them. (A quick nod to Lee J. Cronbach, who crafted that vision.)

The National Curriculum is a horrid, dull, uninspiring farrago that quacks when it should lead, and acts as ballast when it should be providing extra lift. No doubt it means well, but it does harm to the spirit. (I hope, dear reader. that you weren't a part of writing the NC, but I'm a risk-taker, and I warned you that I'm opinionated.  And, you should be ashamed of yourself. So there!)

Many years ago, I was an observer/advisor to the NSW lower secondary science syllabus committee, and I became aware of the problem at Snake Gully Central School (not its real name, for obvious reasons). There, each year, there was one science teacher, and the idiots in Staffing sent out a new first-year-out teacher each year, to be the only science teacher in a small school, with no support, no guidance—and no hope.

In particular, the syllabus was deliberately "non-prescriptive", which meant it offered zero guidance or advice, and young teachers need just that. By mid-year, in three successive years, the new teacher had packed up and gone by the middle of the year, and the principal wrote an impassioned letter asking for a bit of common sense, which outraged the air-headed theorists.

Their theories were fine, but totally unrealistic; their doctrines were unworkable. I watched them, and went away to do what I could to get helpful ideas out there. I still care about turning theory into practice, and buried in the mess of the National Curriculum, there are some useful suggestions.

As a bureaucrat, I lurked in the interstices, and wriggled through the gaps, doing practical things among the inert and the fearful, making life easier for teachers, and so now, as Advanced Middle Age looms, I have set out, once again, to make life easier for teachers. It occurred to me that an old sweat knows the tricks of the trade, and has a duty to share those tricks before falling of the perch.

I am a private citizen, so nobody has to listen to me, and I certainly don't have to listen to the plastic trendoids who wrote the curriculum. So far, the clean draft of my guide is complete, up to Year 6, and I am now tackling Years 7 to 10.

Teachers, I believe that the format covers most of the things you need: if you have any thoughts for improvements or additions, I would welcome them.  I have the time and the equipment to solve most challenges, but don't fear any copyright rubbish if you take one of my basic ideas and do something with it.

The Creative Commons copyright shown on my activities is Attribution, Non-commercial, Share Alike, but as I see it, the format is just a format, and not subject to copyright. Take the framework, and do your own thing!

Use it as you see fit, but if you see an essential aspect that needs to be added, please throw those thoughts to me, so I can do the heavy stuff.

It's time for Stone Soup, people.

Normal service will be resumed shortly.

Monday, 30 April 2018

The Microscopist's Mate, part 6 of many

Just for the record, all of what you find here, and in the other blogs in this series, is now available in fuller detail in my e-book Looking at Small Things.  Go to this link to find out more about how to get the free low-resolution copy, or the cheap high-resolution version: I'm a professional writer, so I like selling books, but I'm also a professional educator, so I like sharing ideas.

There's a similar free or cheap deal on offer for my Playwiths ebook as well, and to see what else I have been doing (LOTS!), go to this link.

(Edit 40/4/2018) Links to previous parts:
Part 1Part 2,  Part 3Part 4Part 5 

Right now, I am designing activities for young people using the Go Macro, and I have just comprehensively sorted out the focal plane problem. In simple terms, a natural leaf is curved, and that means part of it are out of the shallow focal plane that we are restricted to.

My usual solution is to use a microscope slide, to flatten the leaf out and hold it in the focal plane, but while I have microscope slides to hand, other people may not. Incidentally, the leaf is resisting a bit here, but when I rest the Go Macro lens on it, it flattens down, soon enough.


Once upon a time, things came in little boxes made of cardboard or even wood (like the matchboxes of my youth). Classier things like chocolates came in boxes made of tinplate, and I still carry my specimen tubes in a Barkley Mints tin, which is recent enough to have a barcode on it, or a neat little PVC box that rattles less. That said, the norm, now is transparent polystyrene boxes.

Most of the bits and pieces sitting on my desk are in chocolate boxes of that sort, so the idea of using them jumped into my head:

Notice the box at the bottom: you will see it in use in the next picture:

Maybe you aren't a chocaholic, though, so I cast around for other solutions:

The lid of a CD "crystal case" also works, and so do the polystyrene Petri dishes that I commonly use for the same purpose. Each of these has a small drawback: a small vertical flange, for want of a better term. This stops the base making a firm contact with the table or desk top, bu that is precisely what we want, so the sample lies, flattened, in the focal plane. The answer is simple: slip a microscope slide or a piece of cardboard under the leaf.

Now we are cooking with gas!

Oh, if you want to buy slides or Petri dishes, I have no relationship with these people, but I have had nothing but prompt service from Australian Entomological Supplies. I note that the owner died recently, but it appears that orders are still being processed.

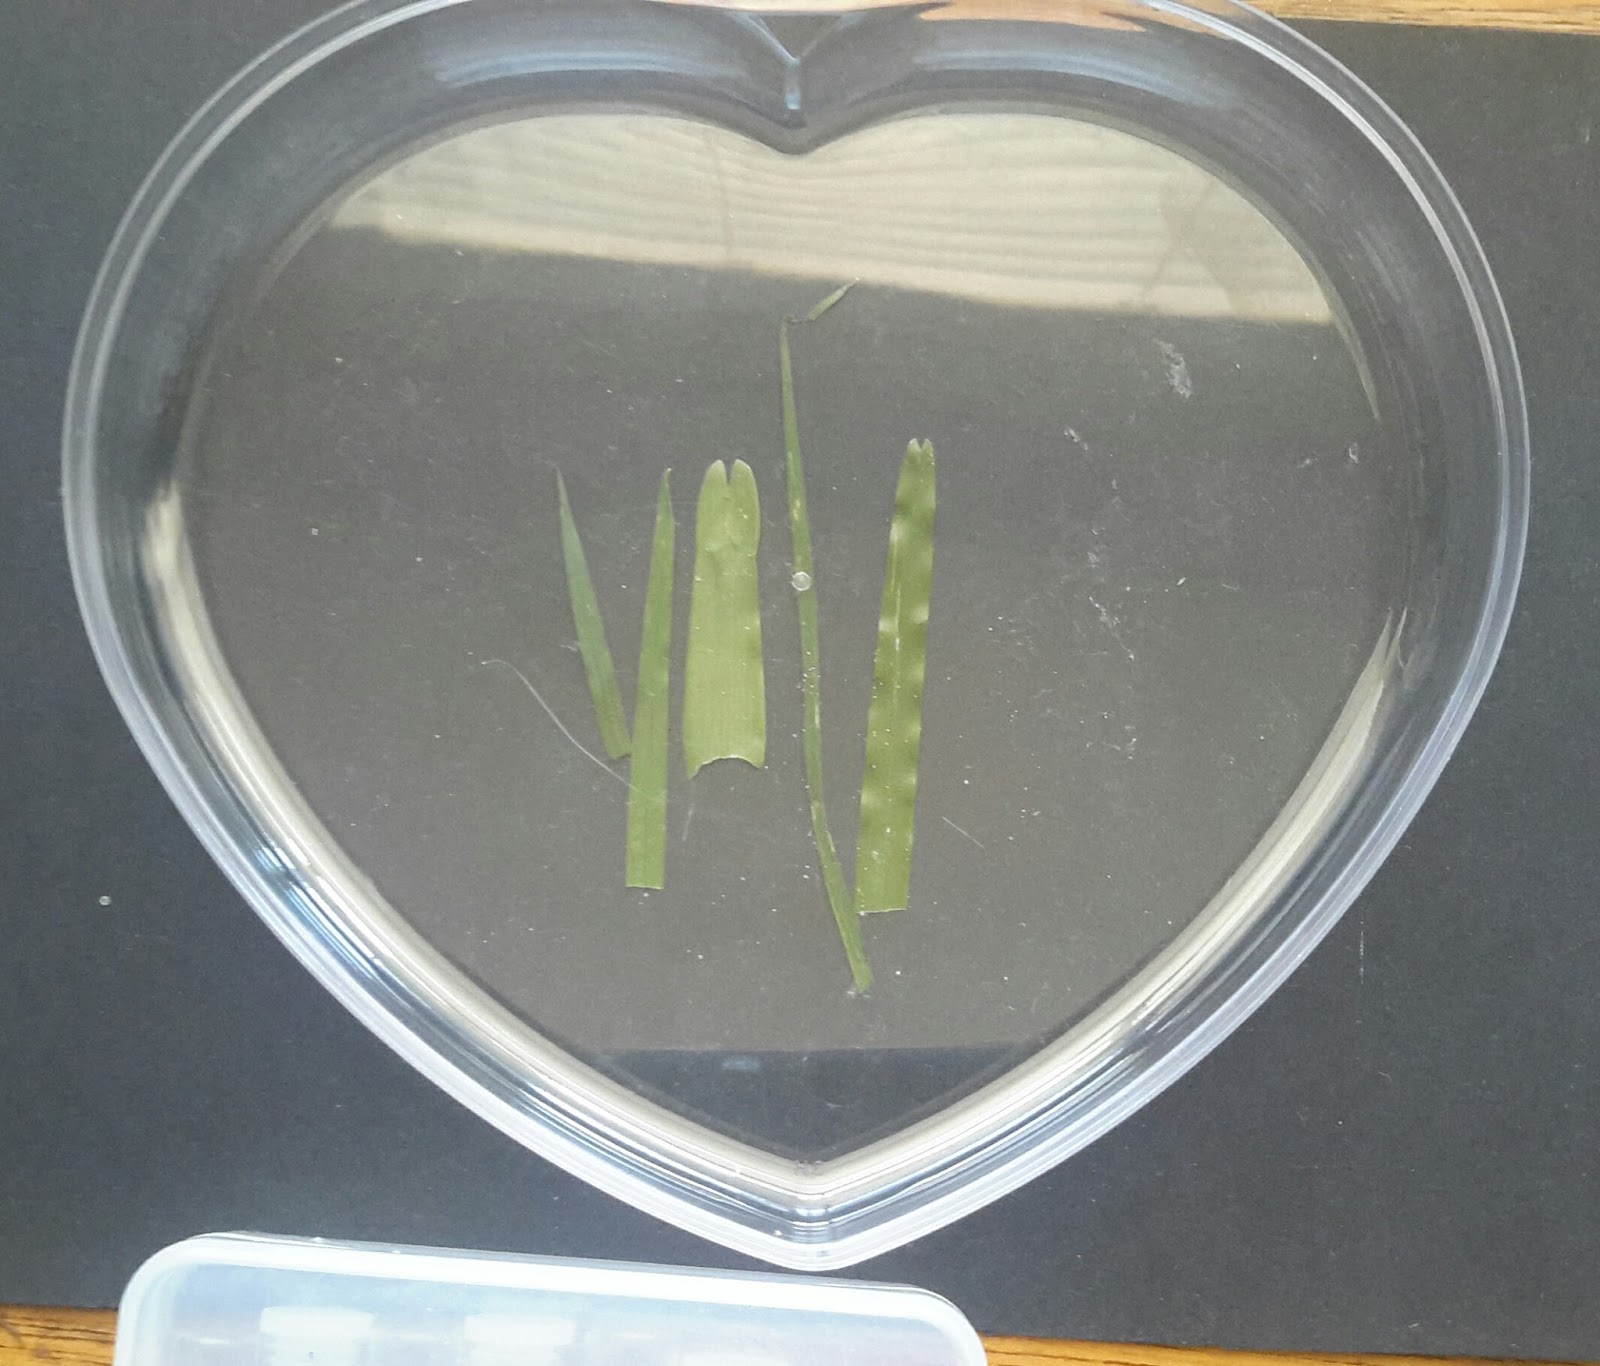
Here are a couple of samples from this morning: I am trying to get good shots of the silica hairs on grass leaves.


Well, I'm still tweaking...

Thursday, 29 March 2018

The Microscopist's Mate, part 5 of many

Just for the record, all of what you find here, and in the other blogs in this series, is now available in fuller detail in my e-book Looking at Small ThingsGo to this link to find out more about how to get the free low-resolution copy, or the cheap high-resolution version: I'm a professional writer, so I like selling books, but I'm also a professional educator, so I like sharing ideas.

There's a similar free or cheap deal on offer for my Playwiths ebook as well, and to see what else I have been doing (LOTS!), go to this link.


Here are the links to Part 1, Part 2, Part 3 and Part 4.

Sorry about the delay, but I have been busy having fun, like this study, where I was looking at stomates, the little pores on leaves that plants breathe through, and which you can see above. Now I have started writing up.


You need some suitable leaves, clear nail polish, clear sticky tape, a piece of glass like a microscope slide, a device and a Go Micro.

Risks and dangers: Spillage or sniffing of the nail varnish. If you have never mentioned Material Safety Data Sheets before,  search on <MSDS acetone>. Microscope slides are fragile, and cuts are possible.

Stomates (or stomata) are pores that are mainly found in the lower surfaces of leaves, and they let carbon dioxide in and oxygen out. They also let water vapour escape, so plants need to control their stomates, which are very tiny. One of the best is a common garden plant with purple leaves, known as Tradescantia pallida.

Old botanists say it has large and clear stomates, ones that can be seen with a 30x hand lens. The stems break off easily, and when pushed into the ground, they take root.

This is what the plant looks like.
The flowers of Tradescantia pallida.
The lower surface of most leaves will be rich in stomates, and while they require a good microscope to see them well, we can take a cast of a leaf surface and look at that. All you need is some clear nail polish, some sticky tape, a microscope slide and a way to light the slide from below.

Stomates are very small, about 0.05 mm (1/20 mm) across, so you won’t see them with the naked eye, but once you know what you are looking for, you can see them with a good hand lens, just as closely-packed dots. The cast, by the way, is usually called “a peel”, and in my youth, they were made with stuff called collodion.

Now, there’s a simpler way, but I will take you through some of my steps, including some false ones.

Choose a leaf: most leaves work, but ones without hairs on their lower surface are probably best, and if you can find that purple Tradescantia anywhere, get a leaf of that.

Then, using a small amount of clear nail polish, paint a thin layer on the lower surface, no more than 1 cm wide and 3 cm long (size isn’t really important). Leave this to dry for about 10 minutes, then press a strip of clear sticky tape down over the nail polish. I used ivy first, then a Camellia and a bay leaf. 

It is worth noting in passing that with a bit of effort, you can break a Camellia leaf in the same way as breaking a piece of onion (I'll get to that some other time), to yield a small scrap of real epithelium, the leaf’s surface layer.

The bay leaf was better. Those tiny dots are stomates, and the first picture below is like the unconvincing view from a hand lens, taken through the Go Micro with no digital zoom.


The next one is at full digital zoom with the Go Micro: this is a bit more convincing!


So you can see these stomates with the Go Micro, but to show you what is visible with a professional level microscope, there is a shot on the next page of a peel from a bay leaf, taken at x100, though the lower right inset is at x400. Once you see this, the lower magnification views will make sense. Each stomate looks like two fat sausages (the guard cells) lying side by side: when they curve around, the stomatal pore opens and gases go in and out.


Two views of a peel from the lower surface of a bay leaf, at x100 and x400 (inset).

As I said, the best plant (and certainly the best I have found so far) for this exercise is Tradesacantia pallida, a purple garden favourite with purple leaves, and one that grows easily from cuttings. Here is what you can see with the 60x at two magnifications:

Stomates of Tradescantia pallida, seen with the 60x.


The rig for this: the slide sat on jar with a light source and a diffusing film, my phone sat on top of the two boxes and the lens rested on the microscope slide.


The same slide, seen through a high-end microscope, at 40x, 100x and 400x

Each stomate is made up of two guard cells: these are the “lips” of the “mouth”, but in Tradescantia pallida, there are two other cells, one at each end, making a rectangle. It is important to note this, because it turns out that you can see the stomates on the plant’s actual leaf with the Go Micro, if you know what you are doing! The next two shots are looking at the actual leaf surface, with the gadget.


This view is looking at the leaf itself, with reflected light. The stomates are the pale square shapes.


Here, the stomates are very visible at x60, but you can even see them, once you know what you are looking for, with a 10x handlens. I think that’s neat!


Friday, 23 February 2018

The Microscopist's Mate, part 4 of many

Just for the record, all of what you find here, and in the other blogs in this series, is now available in fuller detail in my e-book Looking at Small Things.  Go to this link to find out more about how to get the free low-resolution copy, or the cheap high-resolution version: I'm a professional writer, so I like selling books, but I'm also a professional educator, so I like sharing ideas.

There's a similar free or cheap deal on offer for my Playwiths ebook as well, and to see what else I have been doing (LOTS!), go to this link.

Here are the links to Part 1, Part 2 and Part 3.

This time, we are looking at coins and notes. Under magnification, most coins show scratches, most notes show fine engraving. Take a close look at this coin, which any Australian will recognise.

A reader who looks at any of my science-related books will be familiar with the coin as well, because I use the Australian 50-cent coin as a standard scale. The coin is 32 mm from side to side, and my reasoning is that in my lifetime, this coin is likely to remain in circulation.

That is why the 50-cent coin appears all over the place here, with redback spiders crawling over it, or lying beside a fossil or a rock. (See here, for redbacks and coins.)

Puzzle your friends

Now take a look at this image on the left: do you recognise it? I came across it, and even though it was a shot I had taken with the Go Micro device, I had to check where it came from.


Find this part on a 50-cent coin and take your own photo: see if your friends know what it is. Or of you prefer, choose some other coin and try it out.

Coin details

Then try some of the other Australian coins, and here, you need a couple of new words: the side of the coin that we call “heads” is actually the obverse to coin collectors, while the “tails” side is the reverse. You also need to know that the details are easier to see on a shiny new coin.

Can you find the initials of Stuart Devlin who designed the reverse of the 5, 10, 20 and 50 cent coins? Can you find two (or more?) different sets of initials for the different designers of the head of Queen Elizabeth II on our coins? Can you work out when the design changed?

No, I don’t know who those people are: see if you can find out. I only know of two, but look at some older coins, once you know where to look.

Over time, coins get scratched, and obviously older coins are more scratched, on average. But out of our “gold” coins and our “silver” coins, which ones seem to be more scratched?

Looking at notes

Here are three images taken with the Go Micro from the new Australian $5 note: would you recognise any of them? The third one might be a give-away, but the others aren’t that easy.

   
Now here are five Go Micro shots of parts of the new Australian $10 note: once again, the last one is the give-away.


If you can find an old Australian penny, KG was George Kruger Grey (not “kangaroo”, as I used to think).

HP who designed King George VI (pre-1953) was Herbert Paget.

Guess who was quite a keen numismatist, back in those days?


Ah, yes, I said it would be green slime, didn't I?
Well, the cultures are still maturing... i will get there, one of these days.

Sunday, 18 February 2018

The Microscopist's Mate, part 3 of many

Just for the record, all of what you find here, and in the other blogs in this series, is now available in fuller detail in my e-book Looking at Small Things.  Go to this link to find out more about how to get the free low-resolution copy, or the cheap high-resolution version: I'm a professional writer, so I like selling books, but I'm also a professional educator, so I like sharing ideas.

There's a similar free or cheap deal on offer for my Playwiths ebook as well, and to see what else I have been doing (LOTS!), go to this link.

Here are the links to Part 1 and Part 2.

Today, I will be talking about a neat little trick for lighting, not the green slime I said I would be on about. What I actually write about here depends on what I am working on, and yesterday, I had an idea.

There are going to be times when you want to shine a light through a specimen, especially when they are looking at slide mounts. I have messed with a few rigs, and I will be building a more sturdy one, one of these days, but here’s a quick and dirty version.

The good thing about quick and dirty versions is that you get the wrong steps thrown in as well, because that detail will help you make a better model for yourself. here's how I started this adventure, by gathering the items below:

What you need: a jar, a headlamp with LEDs, scissors, and some translucent plastic cut from a milk bottle.
 After I took this shot, I added sticky tape to the list. I used a 400 gram jar, because you can sit a microscope slide on top. These next four pictures tell the story.


I realised as soon as I tried this out that the camera microscope was focusing on roughness in the plastic, so I replaced the plastic with a piece of tracing paper and stuck that to the jar.

In my final version, I plan to have the diffusion layer (the plastic) 2 cm below the slide, but for now, I am using this arrangement to steady the camera.

Remember that one of my major concerns will always be camera shake. The Go Micro clip-on is resting on a microscope slide that is across the jar. It’s primitive, but it works!

The first rule of gadgeteering, though, is never to give up while you are ahead. The next morning, I spied one of those clear plastic throw-away containers that, typically in our house, had not been thrown away, but been used to store something important, like pieces of string too short to be of any use. Anyhow, it was pressed into operation, but an image of the base showed through:


I could work around that, but  I went straight to Mark III, seen in the second and third shots. This one uses a square flexible plastic box that is just sturdy enough.

 And here is how it looks when i light the head lamp:

The thing is, though, that the morning I did this, I had some sand samples that were dry enough to look at, and for most purposes, you don’t want back-lighting on sand (yes, I have some plans to work with crossed polarisers later, but this is now). So needing a light from above, I reached for the original Mark I and a bit of black cardboard, and took these next two shots.


I could have done without the slide here, just laying the sand on the cardboard, but I had something else in mind. Using the paint brush, I spread the sand out and got the shot below, a 9 mm diameter field of shoreline sand taken from St Heliers Bay in New Zealand.


I am conservative about the biosecurity of specimens like this, so even though marine sand is not an import that must be declared, all my samples were both microwaved and baked in an oven before they came anywhere near Australia. Sand from freshwater lakes, on the other hand, must be declared, but my interests are fully taken up with marine sand.

Anyhow, that has solved most of my present lighting problems, and I hope it has helped with yours!

Maybe next time, it will be green slime time, but then again, it might be sand or pill bugs, which used to be sold as a cure for all sorts of ills.