Search This Blog

Sunday, 15 July 2012

Collecting engravings

Acacia sp.
Here in Australia, our "winter" is almost at an end, according to the flowers.  That said, the sun is low in the sky, even at noon, and that make this the ideal time to get out in the bush around Sydney, looking for Aboriginal rock engravings.

Today, my wife and I were taken by Matt Hunt to see some we didn't know, not far from home, within cooee of Oxford Falls and within earshot of radio-controlled model aircraft.

During the morning, I counted the following in flower:


  • 7 wattles (Acacia sp.)
    Acacia longifolia.
    Boronia sp.

  • 2 daisies,
  • 1 Hibbertia,
  • 1 Grevillea,
  • 2 flannel flowers (Actinotus sp.),
  • 1 Woollsia,
  • 1 Boronia,
  • 1 Leucopogon,
  • 2 Epacris species,
  • 1 Eriostemon,
  • 1 pea, probably Hardenbergia,
  •  1 Banksia.


Boronia sp
 We also saw wallaby tracks, counted a dozen or so birds, and got to a rather wonderful collection of Aboriginal rock art.

Most of this has been almost completely untouched since white people arrived in 1788 with diseases which killed off most of the custodians and severed the spiritual and mythical links between the engravings and the culture that sustained them and was sustained by them.


Click on any of the engravings shots to see larger versions.  Note that no copyright
claim is made on these: they are all Creative Commons attribution shots, but note also
that larger (and unenhanced) originals are available on request for any good cause.
They have been there for 224 years, almost untouched, except when they are harmed by vandals or fools. Sadly, we have a few of those.
The figures are all placed on flat slabs of Triassic Hawkesbury sandstone, most of them on high ridges, and when I was young, I was taught that this was so women and uninitiated boys would not see them, or because it seemed closer to the spirits/gods.  It is more likely that the most suitable stone is that with a high silica content, which is more resistant, and so ends up staying where it was, up high.  I definitely know of sites which can be looked down on.

The figures include humans, food and other animals, and sometimes, spiritual beings—we think. Nobody can be sure, because proper knowledge was only passed down to young men when they were initiated, and the culture shock of white arrival broke those chains of knowledge. We are left guessing.


For a quarter of that time, since 1956, I have been visiting and sometimes finding these sites. It's my way of paying homage to the people we displaced.  I didn't do the wrong thing, but I have benefited from others who did wrong, and that wrong can never now be righted. We can, at least, recognise that wrong was done.
These are probably three eels.  Note that you will often see feet in the photos, as a way of getting a scale: you will never see those feet on any of the lines. We walk softly, respectfully and carefully, because these are fragile works of art, more than two centuries old.

The figure nearest the pool is one of a number which have been stupidly scratched by somebody who hadn't a clue, and who has often gone off the line. You can see something of the same effect below.


Note that male figures are usually identified as such by a rough depiction of a penis, though sometimes male figures are recognised by a line at the waist, representing the hair belt worn by am initiated man.  The eel with the bands (above and below) is a puzzle: is it wearing multiple hair belts?  It was probably important in passing on a teaching legend.
 This fish, for example, has been scratched over by an idiot: it isn't overly clear, but the line of the body cuts across the pectoral fin.

 In the shot below, look at the fin on the right. On the left, just in front of the pectoral fin (lower down the picture), notice how the scratcher has gone outside the line.

Below, several fish, something that may or may not be a bird, and some mundoës, which are supposed to be footprints showing a path to be followed.


This is a shark, something which those with zoological training can tell by looking at the tail, which is heterocercal: it has two unequal lobes. Sharks have negative buoyancy and no swim bladder, and they get lift in the water by the sculling action of the lower lobe, which the more rigid upper lobe drives the shark forward: that means that by angling its pectoral fins, the shark gets lift there as well.

The idiot who worked on this made a mess of the tail, and brought is closer to the homocercal tail of bony fish, as well as missing the line of the upper lobe, which is on the left in the photo.  The idiot also chopped off the fin on the shark's right.

If I am right, this is a wobbegong shark, but whatever it is, the head is seen from above, while the tail is seen from the side: the Australian Aborigines had different criteria on accuracy, and this depiction communicated better to its audience.

If you need to photograph engravings, use water, like this:

We went to a second nearby site which has unusual mundoës with toes.  Or toës.

Now the first rule is to get the sun as low in the sky as possible: winter is better than summer, early or late in the day is better than noon.  Then you need water: compare the shot above with the two below and see how splashing a bit of water around, with the right choice of angle, the detail comes out.


So if you go looking for engravings, take along a few spare litres of water.  After all, these things have been rained-on for more than two centuries now.

Reminder: no copyright claim is made on the shots you see here: they are all Creative Commons attribution pictures, but note also that larger (and unenhanced) originals are available on request for any good cause. The photographs seen here have all been digitally fiddled to improve the clarity.

Saturday, 7 July 2012

Leech-wrangling, a grand-daughter's mantis, and vacuumed trees.


Writing a book has its fun bits, mostly when I am planning the chapters. This is followed (for me, anyhow) by exhilarating bits like banging out the first draft. That is the equivalent of getting a block of marble and marking up the outlines on the block and doing a bit of rough-hewing.

Then the drudgery starts, polishing, tweaking, working through the logic and the sequences, double-checking the text, cleaning up sloppy wording, eliminating the bits that only got in because I was brimming over with bubbliness when I wrote that chapter—not to mention looking at the safety aspects that come into suggesting projects that involve sharp tools and live things that may bite sting or be plain antisocial.

If you write professionally, you can't afford to resent the needed time and trouble, because effort like that makes a book work. The same goes for the finicky double-checking of references, finding pictures, writing captions, proofing and the like.

Talking of proofing, I have a cunning trick, which is to convert the text into mp3 files using software that I bought quite cheaply, from TextAloud. You need to train the software to handle technical terms, and it has a few problems the words like lead and read which have more than one correct pronunciation. That's easy to deal with.  Once my file is created, I play them while reading the text. It's dull, but essential.

Equally, the changes recommended by editors, the cuts dictated by design needs, are essential parts of the process. (Secret hint: it's the great editors and excellent designers at the NLA that keep me loyal. With them at your back, getting a beautiful book is a doddle.)

Late in the piece, as the last of the less-fun bits pile in on me, I keep promising myself that next time, I will write fantasy, where I make the stuff up as I go along. No more fact-checking, no more emailing researchers to find out where they found that weird beetle next time, I tell myself.

Instead, I will write about a bunch of sheep who wear Viking hats so people will mistake them for mad cows and not eat them: no research needed there. The sheep are planning to "borrow" one of the Crown Jewels from the Tower of London: no research needed there, not if the sheep are time travellers who saw the Tower being built, so they know about a secret tunnel. Definitely no research needed there…

Not quite: you see, I had to set the date of the heist in a period before video-cameras, and chose 1951, on the second day of the Festival of Britain, a date was chosen because research told me the Beef-eaters would be tired that day, then one of the Tower ravens stowed away and joined the cast of characters, and that meant more research—and on it went.

Well, that could be my next book, but it might not be, because I'd miss out on a lot of fun. I used to be a science teacher, and my students always knew me as a fiddler who had some sort of gadget on the go: a home-made 4-metre gas discharge tube; a hovercraft powered by a superannuated vacuum cleaner; a kerosene-tin eucalyptus oil still; a water-powered mineral-sands concentrator; a slow-gain feedback loop using a tuning fork and an old telephone earpiece; or a culture of tiny crustaceans.

We all used to have fun with these things. The gadgets might get a brief mention in class, but to really get to take a close look and find out all about it, students needed to drop in at recess or lunch, or before school. A major part of my cunning plan was that many of the simpler ideas were portable—and they won hearts and minds.

Anybody who reads my books will probably realise that this leopard hasn't changed his spots, because the books offer simple gadgets anybody can make. And when people make and use them, they will learn. So I'm still out there, catching hearts and minds, but by itself, that wouldn't be enough reward. I need the adventure, the shared discovery and the amusing moments. I will offer one example of each.

You can't experiment with the sheep in Viking hats as you can with leeches. I was fortunate that my wife Chris is a brilliant leech magnet, so even on high, dry, Hawkesbury sandstone ridges, if we stood still for a minute, one or two lean and hungry leeches would appear, looping along like "inch-worms", hurrying to reach her shoe, aspiring to reach her ankle.

They never did. Leeches aren't very bright, and if you hold an open jar in their path, they will go right in. Then, when we get home and need to photograph them, my tame leech magnet comes along and puts her hand where it needs to be to draw them into the camera's range. I often put animals I was snapping on a dry platform in a large dish of water, but guess what? Leeches can swim. I learn, so I win!
After that, mantises were easy to find at home.
That's always the way, it seems!

The mantises were different. There had been none at home, but I found one when we visited our grandchildren, and being an opportunist, I grabbed it to photograph. And again being an opportunist, I shared my find with my grand-daughter, who was then 4. The upshot was that the mantis became her new pet and a couple of days later, we took some mantises from her garden to her kindy, and a whole class was made mantis-aware. I win, again!

The amusing item is different. I have to apologise to the lady who was walking her dog quietly along a bush track and came upon a ragged character who probably resembled Spike Milligan on a bad day, who was busily running a portable vacuum cleaner up and down a tree.

She probably ended up with a good tale to tell, but she fled before I could explain that I was merely validating a method I had read about for gathering very small animals, especially tardigrades, from a tree's bark. It was slightly embarrassing to me, and apparently quite alarming to her, but I got a great story to dine out on. So I guess I win again. Maybe she got a great story as well.

Pay attention please, you sheep in Viking hats: if you want my help to get you transferred onto the printed page, you must offer chances for me to have fun and to win. Otherwise, I think I'll go back to rummaging around in the undergrowth, looking for unexpected and curious life forms. I just know I can always have fun there!

The next entry will emerge from stuff I put together for a talk I gave at the State Library of New South Wales in their 'Scholarly Musings' series.  I am doing a lot of writing for younger readers at the moment, and I have been giving it quite a lot if thought. Talks like that, and the actual writing are the main reasons why I have been less active here.

Tuesday, 26 June 2012

Flatworms at a glance


Yes, been busy again.  The other day, though, I found a land planarian, so I thought I would dig out a section of the book that was cut, mainly because flatworms or planarians can be hard to find unless you know where to look. The one on the right is the type that lives in water,

These are just very small flat worms, and more common in fresh water than you may think. In the wild, flatworms that live in water avoid the light, so they are usually found attached to the under-side of stones or twigs, and they will often be in groups. They typically have a pointed tail-end and an arrow-shaped 'head' end, with two very primitive eyes, little more than two light-sensitive patches. Most of them are less than 10 mm long.


A land planarian looks sometimes looks like this, with a sort of "shovel" head. For some odd reason, people don't call them "land flatworms".  Posh people call them terrestrial planarians. (I put that in there for the search engines).

Land planarians have a much longer body, up to 300 mm long. They also have a shovel-shaped head, and they travel on a layer of slime like a snail or a slug. The slime is amazing stuff, because it hardens, and if a land planarian goes over a drop, the one species I have played with is able to lower itself down on a thread of hardened slime, like a spider descending on its web. The body gets much longer when it is stretched by gravity as it dangles. On the flat, they are about a third as long.


Land planarians will eat earthworms so they can sometimes be a problem in worm farms (which means you may find them in a worm farm!), but they also eat a wide range of other garden 'meat', including slugs. If you leave a small piece of meat in some leaf litter, inside some sort of cage to stop larger animals getting at it, you may attract a land planarian, though this has never worked for me. This one was on a brick wall and quietly consuming a small millipede. For scale, the picture covers a space about 10 mm high.


Notice the slime here (if you click on the picture, you should see it full-size). I think this is how they digest their food.


The last reliable count that I have seen, made in 1999, showed 822 species of terrestrial flatworm around the world. The world's greatest variety is seen in mainland Australia, Tasmania and New Zealand.

But why are flatworms flat? Probably, so they can breathe! With no lungs, blood or circulation, oxygen has to diffuse in through their skin to reach all of their cells, but the gas is all used up before it gets more than about 0.5 mm from the surface, limiting their thickness.

Flatworms will regenerate (grow back missing bits) if you chop them in halves through the middle with a sharp razor blade. It is also possible to split the "head" lengthways between their primitive eyes, and produce a two-headed flatworm. This requires a sure hand, and it is unkind. Both ends of a cut worm will grow the missing end, and both ends of a trained worm were once supposed to recall a lesson taught to the whole worm, though most people no longer believe this.

Flatworms are photonegative (light-avoiding) so they need to be kept in opaque containers with covers. With the water ones, change the water regularly, feed them once a week on chopped raw beef liver or hard-boiled egg yolk, and take out the left-over food with a pipette after a few hours. Apparently they do not often reproduce sexually in captivity, but do occasionally produce orange "cocoons" that hatch out a month or so later. They also reproduce by fragmentation, even when nobody chops them up.

I have caught aquatic planarians in the past by scooping up some drain mud and putting it in a white dish, then waiting for the mud to settle, at which point, they leave tracks in the mud that you can see. Happy hunting!


* * * * * * *
This blog covers quite a few different things, so I tag each post. I also blog about history, and I am currently writing a series of books called Not your usual... and the first two have been accepted by Five Mile Press, The offcuts appear here with the tag Not Your Usual... . For a taste of Australian tall tales, try the tags Speewah or Crooked Mick.   For a miscellany of oddities, try the tag temporary obsessions. And language us covered under the tags Descants and Curiosities, while stuff about small life is under Wee beasties.


Thursday, 14 June 2012

Rashomon times 2 (or 2 plus 1)

OK, there was a bit of a hiatus there, mainly because I have been busy with Other Stuff.

In particular, I have been concerning myself with Australian history, in a work for younger readers. It's actually one of a series, written with the view that even complex issues can be handled by young minds, given the right presentation.

In Akiro Kurasawa's classic film, Rashomon, one story, about a murder, is told by four people: the bandit, the wife, the samurai and the woodcutter.  It is fictional.  Each version is different.

Well, I have a similar multi-version story, but it's from real life.  It involves an incident where nine versions are given by eight people, and they are all subtly different about the number and type of animal, the date (some are less specific) and in some cases, the owner(s) of the stock which were killed by a lightning strike, not long after the first white people came ashore in Sydney in 1788. The animals were in a pen (or shed) under a tree, and it seems they all perished: this was a bit of a disaster.

We are taught to pay attention to primary sources, but what are we to make of these discrepancies in first-hand accounts, written on the spot?  Perhaps some of it was due to editing or the careless making of "fair copies"?

I have done some colour-coding in the text to help you spot the variations.
In February, the weather was sultry, with lightning, thunder, and heavy rain; this sort of weather continued for a fortnight, with few and very short intervals of fair weather; a flash of lightning fell one night near the camp, and struck a tree near to the post of a centinel, who was much hurt by it; the tree was greatly rent, and there being at the foot of it a pen in which were a few pigs and sheep, they were all killed. 
John Hunter: An Historical Journal of the Transactions at Port Jackson and Norfolk Island, chapter III

Ere we had been a fortnight on shore we experienced some storms of thunder accompanied with rain, than which nothing can be conceived more violent and tremendous, and their repetition for several days, joined to the damage they did, by killing several of our sheep, led us to draw presages of an unpleasant nature. 
Watkin Tench: A Narrative of the Expedition to Botany Bay, chapter XV.

The month of February was ushered in by a very violent storm of thunder and rain. The lightning struck and shivered a tree, under which a shed had been erected for some sheep, and five of those animals were at the same time unfortunately destroyed by it. 
Arthur Phillip, The Voyage Of Governor Phillip To Botany Bay, chapter VII.

2nd February. This morning five sheep, belonging to the lieutenant-governor and quarter-master, were killed by lightning under a tree, at the foot of which a shed had been built for them. The branches and trunk of the tree were shivered and rent in a very extraordinary manner. 
John White  Journal of a Voyage to New South Wales.

Abt. 12 o'Clock in the night one severe flash of Lightg. struck a very large tree in the centre of the Camp under wh. some places were constructed to keep the Sheep & Hogs in: it split the tree from top to bottom; kill'd 5 Sheep belonging to Major Ross & a pig of one of the Lieuts. 
Arthur Bowes Smyth, A Journal of a Voyage from Portsmouth to New South Wales and China - in the Lady Penrhyn, entry for February 6.

On the First Day of this Month, We had a vast deal of heavy Rain. Thunder & Lightning, and the next morning 5 Sheep, 1 Lamb. & 2 Pigs, were found dead, lying under a Tree, which was riven in a violent Manner by the Lightning... 
George Worgan, Journal of a First Fleet Surgeon, entry, Tuesday 5th February. (SEE NEXT!)

We have reason to apprehend that much Mischief may be done by Lightning here. Indeed we have experienced its fatal Effects since we have been here, for one Night 6 Sheep 1 Lamb, & 2 Pigs that were lying under a Tree, were all killed and the Tree violently riven. 
George Worgan, Journal of a First Fleet Surgeon, 'Climate'.

In the night of the 6th February, six sheep, two lambs, and one pig, belonging chiefly to the lieutenant-governor, having been placed at the foot of a large tree, were destroyed by the lightning. 
David Collins: An Account of the English Colony in New South Wales, Vol. 1, chapter I.

Thursday 7 where I went to Supper being ask my God how it did thunder and Lighting - was very much frightened for the Centinell before Majr. Ross markee while we were at Supper was knock down with it - I thought at first that he had been Struck by the lighting as he came running and making a great noise and fell flat dount at my feett but he was not hurt but I am Sorry to find that by the very hard clap of Thunder the lightning Struck one of the Trees near where we were at Supper and Kild Six Sheep 2 Labms and one Pigg belonging to Major Ross…
Ralph Clark, Journal.

Before you ask, Major Ross was the Lieutenant-Governor.

The spelling, especially in Clark's case, represents what the writers wrote.  People didn't have the same hang-ups about spelling back then.

I think there are some interesting conclusions to be reached from studying this, but probably not in a book for 10-year-olds, so I am sharing it here.  If you are a teacher, please feel free to use this, any way you like.

Technical and teacherly matters
There is no copyright on any of this.  If you want to view good copies of the journals, most of these can be sourced from the University of Sydney's SETIS site.  Select the Browse—All link on the left, and then look for the ones where a PDF is available, and either read or save it.

Another source that I have used is Project Gutenberg. That has given me:


  • Arthur Phillip, The Voyage Of Governor Phillip To Botany Bay;
  • John Hunter: An Historical Journal of the Transactions at Port Jackson and Norfolk Island;
  • David Collins: An Account of the English Colony in New South Wales, Vol. 1;
  • David Collins: An Account of the English Colony in New South Wales, Vol. 2;
  • Watkin Tench: A Complete Account of the Settlement at Port Jackson;
  • Watkin Tench: A Narrative of the Expedition to Botany Bay;
  • John White  Journal of a Voyage to New South Wales;
  • George Worgan, Journal of a First Fleet Surgeon.
  • Ralph Clark, Journal.

I have cleaned all of these up, using macros in Word, and pasted them into a single file. Then I added these journals in whole or in part from transcripts on the State Library of NSW site: those may be copyright, but my copies are purely for personal research.

  • Smyth  (from State Library of NSW);
  • Bradley (part, from State Library of NSW);
  • Easty  (part, from State Library of NSW);
  • King  (part, from State Library of NSW);
  • Nagle  (part, from State Library of NSW).

These journals and extracts are all in the one big MS Word file (1300 pages, almost a million words).  Each volume has a Heading 1 header, the chapters are Heading 2, and extra markers (for example, when somebody reaches Rio) are Heading 3. This allows me to navigate using Document Map.

And search. The trick is, when I search on some key word like Wilson*, sheep, lightning or salt, I can quickly find the stuff I want.  I had noticed that there were several versions of the lightning strike, but I never expected NINE of them!

I am hoping that with this hint, I may get a few people using IT in a cleverer way to make genuinely new discoveries.

Anyhow, that's why it's been a while (there's also another rather different book in the works, but I'm not discussing that just yet—unless I mentioned sheep wearing Viking helmets so people will mistake them for mad cows and not eat them—shhhh!).  Next week, I'll get back to posting some off-cuts from Australian Backyard Naturalist.

————————————

* Wilson, or Bun-bo-e was a convict who, when his time expired, went to live among the Aborigines and became an initiated man. I am exploring his story at the moment as well.

Saturday, 2 June 2012

Thinking about slugs and snails


Rule 1 of being a naturalist: the most interesting questions are your own questions!

These are some random thoughts about snails that were left over from the book.  Waste not, want not!

Snail home.
Slug home.
I was inspired by the fact that I have had a snail living in a jar on my desk since the start of the year.

If you read my book, Australian Backyard Naturalist, you will learn that the shot on the left is of a slug that lived in that jar for ten months, given regular feeds of lettuce, spinach and bok choy, before I let it go. The photo on the right shows a snail with a damaged shell that has been living in the jar since the start of 2012.

I don't want to let it go, because, with a big panel of shell missing, it won't last long, so I am waiting to see if it can repair its shell.  I don't think it can.


You may like to try conducting some snail races.

You might like to try using light or dark to get snails to go in a single direction, or you might like to see if snails can be attracted by a favourite food—assuming you can identify the favourite foods of snails!

Some foods you might like to try: basil, lettuce, almost any young and tender seedling shoots. Try planting three or four types of seed in a single tray. After a week, when the seedlings are shooting nicely, add several snails, cover the tray, and then come back the next morning to see which seedlings were eaten first.

Be careful not to jump to conclusions until you have tested a few other possibilities!

I have a theory that some hairy or spiny leaves may be less attractive to snails and slugs. Can you test that?

Are snails faster than slugs?


Snails come out when it rains
This makes them excellent for rainy day investigations like these:

• To observe snail movement, put a snail on a piece of flat glass, and hold it up to look from below.

• To record snail trails, you will need a snail, a clean sheet of paper, and a supply of pepper. Put your snail in the middle of the paper, and leave it alone. After a while, the snail will start to travel across the paper. If there is a slime trail, sprinkle pepper on the trail before the slime goes hard.

• Can you invent snail art?

• How do snails react when they cross the slime trail of another snail? Does the age of the trail make any difference to the way they react?

• How long does it take for a slime trail to go hard?

• How many days does a trail last?

• Where does it disappear to?

• You may care to see whether you can get a slime trail like those of land snails from slugs and marine shellfish. I have never tried this: I predict that marine shellfish do not make a slime trail, but that slugs do. Perhaps you might like to work out why I think this, and then test it.

• What use would a snail trail be to a predator? From this, can you make some predictions about the smell or taste of the slime trail? How would you test your predictions? Do so.
These shells were all attacked by predators that bored the shells.

• You will need a large supply of bored shells of one species of seashell. Examine the shells to see whether the boring predators go for any particular part of the shell in a given prey species, or if they just bore at random. You will need to think about how you analyse your data.

• As a follow-up, you may need to study the anatomy of the selected species to see what the borers aimed at. Some of the victims are bivalves, shellfish with two shells, which are more distantly related to the snails. Think about where the muscle is thet holds the shells together.

• When a garden snail is threatened, it pulls back into its shell and often produces bubbles of mucus. My guess is that these bubbles taste bad or are poisonous, but I have never tried a taste test, and I don't recommend the experiment! Incidentally, snails are edible, but don't eat garden snails, in case one of your neighbours is using some sort of snail poison.

Just watching a snail move can be fun. This one is from the
Margaret River area, and I shot it in late afternoon sun.
• Why do so few slugs get eaten? One way to find out might be to try eating a slug, but this is not a good idea. What if it has just eaten snail and slug poison or makes its own poisons (and how can you be sure?). What effects would these poisons have on the wildlife in your garden?

• By the way, at least one sea slug, found on New Zealand beaches, carries a deadly poison, tetrodotoxin, but no Australian deadly sea slugs are known. Tetrodotoxin is the same poison found in the Japanese fugu fish and the deadly Australian blue-ringed octopus.

These land snails were all gathered on the Swan River at
North Fremantle.  Take a close look, and see how many
different species I found. I think there are three or four.
By the way, if you click on any picture, you see a larger form.
• How does a snail's speed vary with size and weight? Does it go faster at a certain temperature or humidity?

• Put ten snails in the middle of a black plastic sheet at night, and make a circle of bricks, with 5–10cm gaps between them, all round the snails. The next morning, check for trails and decide whether snails can see or not? Run the same test during daylight and compare the results. If you learn nothing, does that tell you something?

• What senses do snails have? Do they react to sights, sounds, smells, or touch? How can you tell the difference between a snail reacting to the touch of a puff of air and a snail reacting to the smell carried in that puff of air?

• If people worshipped the Giant African Land Snail, would this be an escargot cult?

• Why don't people worship writers who make bad puns?

Wednesday, 30 May 2012

Normal service will be resumed shortly

In 2008, and again in 2009, I indicated that I was working on some YA historical fiction, referred to as The Cornish Boy.  I then closed it down to get on with other more urgent work, but in the past couple of weeks, I have returned to it.

This (if it works—and sells) will be a sprawling work, featuring a Cornish boy who is bright, has some medical and scientific training, but has to leave Cornwall in a hurry, with killers on his trail. With the help of friends, he eludes them, gets to Australia, and as teenagers did back then, he went out with an exploring party.  There's a great deal more in book 1, but that's all you get for now (though it won't be giving too much away if I add that he makes an enemy and several good friends.

Later books see him on the Turon River gold fields; shipping as assistant naturalist on a naval expedition to map the Gulf of Carpentaria, based on the 1850s cruise of HMS Rattlesnake; helping a group of Chinese would-be gold diggers  while they are trekking from South Australia to the Victorian goldfields.  Large numbers of Chinese did this to avoid a head tax that was imposed on Chinese landing at Melbourne.

Later, he works on a paddle steamer on the Murray, marries, they make an exciting find (yes, I am being reticent there) that draws more attention from shady characters than they need, and they settle on a farm—and a few answers are at last revealed.

The four planned books run from 1851 to about 1867 and encompass a lot of Australia's key historic points.  Eureka will only be seen off-page, so to speak, but there's a lot to say about the way Australia became a nation with independence of mind. The Bulletin only emerged in the 1880s to press a fully Australian sense of nationalism, but as I will be explaining in Curious Minds, due out on October 1, the leaders in the revolution were a bunch of foreign, mostly German, naturalists.

Now watch out: here comes the pedagogue again: there is an old saying, originating with Jerome S. Bruner, that you can present any subject to a child at any developmental level. in an intellectually honest fashion.  I won't be teaching, but if I can get a few readers to "what if Jack had done this instead of that?", I have won.

You see, as I have said before, education, teaching, training, wisdom, knowledge, learning, understanding and erudition are not the same thing, even if they are cousins. That's a key consideration for me.  I have written scraps of fiction before, but this is the first serious fiction I have completed and it's big. I have finished the second draft of Book 1, and I think it works, sort of.  It's taken me ten days to knock into shape the work I did two years ago, and right now, I will be drifting off into something far fluffier.  I need a sort of writing sorbet.

There's a bit of the educator in me coming out in this series, and that's always a risk.  The main areas I will be including are all areas where I have written before, like Australian exploration, rockets and poisons, plus an area I am currently working on, which is the Australian gold rush era.  This is a major trap for old educators, who feel, a bit like Jean Auel in Clan of the Cave Bear and spin-offs, that all that hard research needs to be crammed in.  My plan is to produce a background web site, where people can test some of the assumptions.

I have made a start on that with my database of early uses of Australian language phrases and slang, where I have evidence to justify the use of terms like billy or goanna, phrases like "having a shingle loose" or "slope off", but I think I can take this further. Rather more though, I want to introduce matters like the amazing multicultural society that was Australia in the 1850s, the (to modern eyes) hidden agenda of the Chartists who, just as they were losing the struggle in Britain, were winning it in Australia.

In short, I will be trying, without preaching, without teaching, to get my readers to wonder more about what lay behind things. It's going to be a hard road to tread, a road slung on a tightrope over a minefield of mixed metaphors.

And that's why, just now, I am busy on something fluffy, involving mad sheep (they say they are mad, but can a sheep wearing a fake Viking helmet with horns be trusted?), a jewel heist, the truth about Van Gogh's ear, virtual normality and dark matter.

Among other things.  The point is, I'm otherwise engaged for a bit.


Saturday, 26 May 2012

Drawing nature


I am passably capable at drafting, but not at execution in any artistic sense, so there are no technical tips here, just some tricks and wrinkles.

In 1857, Herschel Babbage took photographic equipment out with him when he went exploring near Woomera in South Australia. Before (and even for a while after that) all explorers and biological collectors needed to be artists, or they needed to take an artist with them.

This, in fact, is part of the subject matter in my next book for the general (that's writer-code for adult or bright younger reader) market, Curious Minds. In that book, I look at the natural history collectors and the natural histoty painters who worked Australia in the 1700s and 1800s.

Painting flowers in water colour was regarded as a suitable activity for young ladies, but in time, some of the women painters did what the men did, and went out into the field, studying plants and birds and painting them. In the end, though, photography took away most of the scientific side, but people still paint plants for fun.

The job of the scientific artists was to record the colours and shapes of the flowers that would often be pressed and dried beyond recognition. Often a bird or a mammal would be skinned, with only the skin and sometimes the skull going back to people who would stuff and mount the animal, using sketches done on the spot to get the shape right. Information on the colours came from paintings and notes, because specimens often discolour.

Magpie at a picnic, Reef Beach, Sydney.
My alpha publisher these days is the National Library of Australia, in large part because that gives me access to their huge art collections,  They also like doing beautiful books, which is a boost to the ego of the writer!  Some of the artists whose work may be found at the National Library of Australia: Elizabeth Gould, John Gould, Edward Gostelow, S. T. Gill, Ferdinand Bauer, Ellis Rowan, Adam Forster and Ida McComish.

This link will take you to the place to search, but you then need to spend some time getting used to the controls.

Pelican on a street light, Broken Bay.
One good trick is to use the Limit To section and specify NLA digitised material in the drop-down menu. For example, there are 83 images of Banksias (or were when I looked just now).


If you want to try to work as those experts did, take a simple and easy subject first, a common bird like a seagull, a pigeon, a sparrow or any of the other pests that will hang around if there is a free feed.

Plants, especially fruits and seeds, are easier to paint!
Rainbow lorikeet, Cremorne, Sydney.
There is no harm or shame in taking photographs to help you with your drawing: the art comes in composing the separate scraps of image into a whole. If you are looking for a theme, why not try behavioural studies, like the aggressive postures of seagulls?

Magpies will lurk near a picnic looking for food, kookaburras will fly through and steal, pelicans will watch you if you are cleaning fish, and rainbow lorikeets love to steal the little paper packets of sugar where coffee is sold.

Hooke's view of a human louse, on
a hair. Most people had 
lice back  
then, but they could not
see the detail. 

On the other hand, there are times when drawings are best. Scattered through most books on biological matters, there will be a number of line drawings of small animals, part of a tradition that began in 1665, when Robert Hooke published a book called Micrographia.  Some might say the tradition goes back much further, but that's where I set the start.  My blog, I get to choose!

Rich Londoners could marvel at the details of a flea without having to squint through a microscope, and a number of them could look at the flea at the same time. Best of all, the drawing could show all parts of the flea in sharp focus.

Mind you, Hooke wasn't all that good an artist, and biologists believe that many of the drawings were actually the work of Sir Christopher Wren, who famously designed St Paul's Cathedral in London.

Biological illustrators use all sorts of tricks to get their pictures just right, so it is a craft and a science, as much as an art. Do a web search on <biological illustration> to discover a whole new world!

One trick that I used to good effect in the days of 35 mm slides was to have a slide projector that I pick up for $5 at a jumble sale, mounted above my desk.  Perhaps, if you have access to a "data projector", you may be able to use that to get your images onto paper.

If you have the skill and talent (and as I said, I don't!), you will never look back.  Otherwise, be like me and use the camera.

Either way, you will be collecting nature without doing any harm.

Sunday, 20 May 2012

Close-up photography


If it is possible, get a camera that can take close-up (macro) shots, and read the instructions. The technology is too variable for me to go into it here, and I also lack the expertise to give really good advice. That said, I have developed some cunning over the years, so here are some of the tricks you need to get the best possible photographs:

First and foremost, read your camera's manual.

Second, with a digital camera, there is no excuse for not taking lots of shots.  Go wild!  Experiment!

Hand-held shots are always a problem, because of camera shake. At the very least, prop your camera against a log or a rock, but if possible, use a tripod. A Joby Gorillapod is excellent (and I use one), but if money is in short supply, go to the web and search on <gorilla pod make> and follow the instructions. The bolt size you want is 1/4".

Whenever possible, I use a remote control, but my cameras (Canon Powershot G2, G11 and G12) don't do this. Luckily, most cameras also have a timer setting that allows you to press the button and let go of the camera before the shot is taken.

Insects are 'cold-blooded', which really means that their insides are at the same temperature as their surroundings. If you chill them down in a refrigerator, you can get unblurred shots more easily.

This is an Australian bull-ant, about 20 mm long, and these things have a ferocious sting in their abdomen. They grab you with the nippers, and within a second, they have doubled up and injected something nasty (formic acid??) under your skin.

If you get around in the Australian bush, shorts are best, because an ant inside jeans or trousers is hard to dislodge, but when you feel the 'nip' on bare skin, you can knock the ant off with a glancing blow.

Anyhow, even though this ant was iced, I didn't want her getting loose, I set her up on blue paper, on a plastic tray, sitting on pebbles in a dish of water.

When I am photographing wildflowers, I always carry a few pieces of wire that I can use to make hooks to attach the flower stem to a solid branch.

Even though it is "out-of-shot", the hook will slow the flower's movement in the breeze.

Of course, if the day is sunny enough, then the speed of the shutter will 'freeze' the picture in any case. I also use gaffer tape, bulldog clips and string at times.

The fourth picture shows the dandelion flower and beaker, showing the set-up that gave me the result.

Note the unusual use of a clothes peg.

You can get better shots when your subject is against a plain background. You can see an example of this is the bull ant shot above.

Carry some A4 sheets of coloured manila cardboard in a folder and hang these behind a flower (or get somebody to hold them) and you can also put them under an insect. Black and light blue are probably the best.


And here is the set-up for a shot of the angle-of-rest apparatus that I used in a blog entry on ant lions, using a cardboard background.

This way, you get a rather neater image than you would if the author's messy work bench was visible.

As I mentioned in an entry on animal tracks, you can get better shots of animal tracks by leaving a smoothed sand tray near a feeder.

Always put something down, not too far from the paw print as a scale object. Locate the object so you can crop it out if you wish.

This dingo print in dried mud was taken in the Kimberleys. The sun was high, making the shot less than ideal.

At least the 50-cent coin provides a sense of scale, but it was a bit too close, and would be hard to crop out.

This wallaby print was taken near Sydney with a more slanting light. It lacks a scale object, but note the tyre tread mark at the top.

For some wildlife photography, the best trick of all is to have a camera which is triggered by a motion sensor, but that is heavy stuff, so check the details yourself. I don't own one of those, alas!

Shadows are more of a problem when you are photographing something on a smooth surface. You can 'fill in' the shadows with a flash (a ring flash is expensive but best).

You can also use crinkled aluminium foil to reflect light from another angle. You need a helper or helpers for this, and you need to know that heat is reflected as well as light, so you may need to be quick to get a caterpillar before it takes off out of the heat.

Looking at the shadows in the first caterpillar, you can see that the sun's light on one side is filled in by a mirror, placed just out of shot on the right.

The second caterpillar was on a track beside the Swan River near North Fremantle. I squatted, used a hand-held camera and a macro setting.  I took about twenty shots to get one good one.  Remember: there is no film to waste any more!

An angled shot often leaves part of the animal out of focus, because it is too close or too far from the lens. Depending on your camera, if you can reduce the aperture, this will increase the depth of field for your shot. This helps explain why so many scientists still rely on line drawings. I will turn to that next time, but once again, I can claim no expertise.

Wednesday, 16 May 2012

The collector's art


In the middle 1800s, the homes of wealthy people were full of dead things. No home was complete without cases of pinned insects or stuffed birds, stuffed animals on stands, animal heads on the wall and animal skins on the floor as rugs. Most naturalists got their start collecting live things, killing them, identifying them and preserving them for sale to rich "collectors".

 Until binoculars were invented in 1859, the year Charles Darwin published The Origin of Species, the only way to study birds up close was to shoot them or trap them in nets.


When I was young, around 1959, most natural history guides would still have been mainly about how to collect, kill, prepare, look after and store collections of dead things. Fashions change, and we try to avoid that, these days.

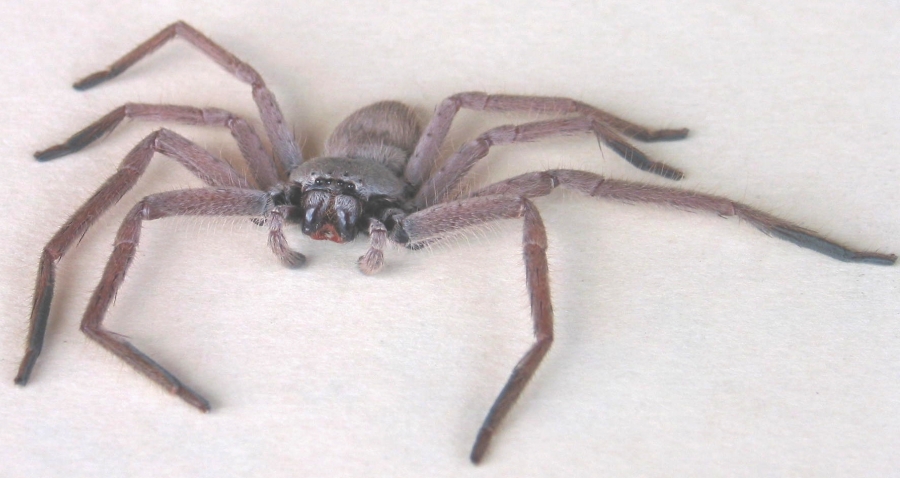
There is still an occasional need to kill specimens. I know from experience that a huntsman spider will never stay still long enough to be photographed.


This shot was deliberately over-exposed. Can you see why?
In fact, if you poke around in libraries, you may find a 1986 book of mine which describes a chemical killing jar, but I no longer recommend those.


The best way to slow down an invertebrate is to put it in the refrigerator, and the best way to kill an invertebrate is to put it in the freezer. This is gentle and painless, but remember to put the spider in a jar first, or great-aunt Ermyntrude may get a nasty shock!

After an hour or so, the animal will have lost consciousness and died, but it will also be contorted and twisted out of shape.

A dead huntsman spider, pinned out to dry in a selected pose.

The same applies to most animals that you find already dead, as was the case with the spider in the shots shown here.

Another view.
In either case, this is when you need to put the animal in a high humidity relaxing jar for a few hours. This softens the animal up so you can arrange it in a more lifelike pose, using pins to hold it in place while it dries.

(The details of how to make a high himidity jar are on pages 192-193 of Australian Backyard Naturalist, and if you look at the sample pages from the book on Google Books, you can see page 193 for free.

Or just go to this link, because I later added it to this blog.

I use entomology pins because they are long and easy to use, but I don't push them through the animal. Instead, I use them to make a scaffolding that holds each part in place while it dries, pinning the spider onto a piece of foam sheeting.

After that, you are ready to take pictures like the top pair.


Monday, 14 May 2012

Rainy day spiders


Sometimes I need a post that basically says "I aitn't dead yet".  This is one of those, because I'm busy on other stuff.  There's a radio talk to clean up, there's a book to start, there are two in progress that need a shove, because they stopped progressing

There is hardly anything in Australian Backyard Naturalist about leaf-curling spiders, trapdoor spiders, spiders that live under water, net-casting spiders, spiders that use lassos or spitting spiders. The reason is simple: it wasn't a book about spiders, but the other arachnids are also fun.  Go and burrow!

A photographic challenge for you: try photographing a flower spider (also called a crab spider) in different flowers or against backgrounds of different colours and see if you can catch it changing colour. Some books say American species like Misumena vatia can change colour, but I've never seen any Diaea in Australia change colour.

The arachnids get their name from the old Greek legend of Arachne. Track this story down, and on a wet day, retell it in your own words, with a uniquely Australian flavour. We are allowed to play with science, you know!

I may come back when I am less busy, and stick a couple of spider pictures in.  Now, it's head down, back to the wall, shoulder to the wheel and nose to the grindstone!

Friday, 11 May 2012

Floating filamentous algae


One dish in two different roles, but
here comes a third way to use it:
In the last entry, I described a method for pressing specimens of land plants.

It is also possible to dry and preserve algae and seaweeds, though some of the thick plants like kelp can be a bit of a challenge. Some thick seaweeds can be pressed if they are soaked in hot water first, but you need to use hot sea water, because many of them just collapse in hot fresh water.

The one thing you must have is a shallow dish.  Mine is a bit of an antique: once it would have been used in the kitchen, but for me, it is everything from an algal culture receptacle to an ant lion home, and as I will explain, one of these days, even as a device for gauging rates of evaporation.

You can't just put the thin seaweeds in newspaper, because most of the algae will just bunch up into a dark clump. You need to 'float' them onto paper, so the parts spread out, and the second picture shows you how to do it.

Like the plant press in the last entry, it comes from my 1986 book, Exploring the Environment. I own the copyright and explicitly release this image into the public domain.

Get a fair sample of an alga into a shallow dish in water. Then slip a sheet of reasonably stiff card or heavy drawing paper underneath the plant. Once you have the alga positioned, slide the sheet out of the water, picking up the strands of the alga as you do, using a small artist's brush. Leave the sheet of paper to dry for a while on thick newspaper and then press it in the usual way.

You can improve on this method.  The one thing you can't leave out is the use of the brush to move the alga in the water. Using a backing board of some sort behind the paper may help. You may need to experiment with covering the more filamentous algae with plastic (on one side only!) when you put it into its first wrap of newspaper. With the back of the sheet uncovered, water will still escape.

The main thing is to know that seaweeds can be floated onto a flat surface.  After that, you are ready to go!

Collecting and pressing plants


If you are going to collect plants in a scientific way, you should use a proper plant press. The drawing on the right shows a good design for one of the two identical frames that you need.

(It is, by the way, scanned-in from my well and truly out of print Exploring the Environment. The copyright is mine, and I hereby place this image in the public domain.)

The best material is 19 x 6 mm softwood, held together with small nails (I called them "panel pins" in 1985 when I did this pic, but going on more recent experience, I recommend using 1" flatheads).

The nails need to be long enough to go right through both pieces, but be sure to turn the frame over and knock the points down flat (and think about where the nail points will go when you first drive them through!). The size needs to be about that of a sheet of tabloid newspaper, because you will use a lot of newspapers to dry your specimens.

You need to know something about plants before you start collecting specimens, so do some research or ask. You need to be able to guess which species might be protected, and you need to know if you are allowed to collect or not. (If you are in a botanic gardens or a national park, the answer is "no!").

Your specimen size will depend on the mounting paper the plants will go on. Use secateurs or clippers to make a neat cut. The ideal time to take a specimen is when it has both flowers and seed on it.

Some plants may be too large for the amateur to press in the usual way.  This is a cabbage tree palm.
Unless you are carrying your press with you (not a good idea because it will be large), put each specimen in a separate plastic bag with a slip of paper noting where and when you collected it, the type of plant (herb, shrub, tree, big tree, maybe some measurements), other nearby plants and whether you are in forest, scrub or something else, and if possible, the type of soil.


Noting the soil type might seem odd, but some plant species are very fussy about where they grow, and your records might reveal this. Around Sydney, geologists used to work out where shale is exposed from aerial photographs. If they can see cabbage-tree palms, there is shale rock beneath the tree canopy.

You can also use a GPS to locate the plant if you have one, and maybe take a photo of the plant with a digital camera (ah, the marvellous toys that the younger generation have today.  Sheer looxury, that's what it is!)

When you get home, put the specimen and the finder note inside two sheets of newspaper, stack the specimens on one frame, put the other frame on top and use weights, a rope or a belt to squeeze the two frames together.

Warning:
You will probably have collected a number of insects and spiders with your plants, so try to store the press somewhere outside that is dry and warm.

You should change the newspaper every day, and don't forget to transfer the finder note over at the same time. The old paper can be put in the recycling, but don't use it for other plants, because it will be damp.

After about a week, once the plant specimens are really dry and flat, you can tape or glue them to sheets of white paper. Use PVA wood glue and apply light pressure for an hour. Glue the finder note to the same sheet and store your specimens in a box. In a proper herbarium, poisonous chemicals like camphor and naphthalene are often used to keep insect pests away: these are not hood around the domestic scene.

Now you need to name your plants. You have several choices to identify plants. You can ask an expert, you can look at a book with photos produced by an expert, or you can use a dichotomous key, a set of questions that you work through until you have only one species left. Using a key is hard, but if you are able to ask an expert, you are also able to ask an expert to help you by showing you how to use a key.

In October, my book Curious Minds will be released in Australia.  There you can read about some of the tribulations of early collectors in Australia: the ones who were inadvertently poisoned by Macrozamia seeds (de Vlamingh's party at the Swan River and Banks' party in Queensland among them), and where the type specimens of the early collectors ended up.  You can see two zamias here on the right.

The majority of the type specimens taken by early Europeans are still held at Kew, outside London, but the French collector La Billardière's specimens are now in Florence!

You will also read of Ellis Rowan, an exquisite water-colourist who did wildflowers so accurately that any botanist can spot their genus and species, but who was hopeless at naming plants, and often had to be corrected. She also won lots of awards, much to the annoyance of the mere males who failed to be as recognised, and who engaged in a long-running, vindictive and spiteful war against her.  The usually well-regarded Julian Ashton was one of the most vicious. His motivation seems to have been that she had the temerity to gain a higher award than Julian's brother George.

I'm glad botanists aren't like that.  Well, not often...

Tuesday, 8 May 2012

A home-made rain gauge


Once you start looking at weather, you may want a rain gauge. You can buy one, of course, but you can also make one from scrap materials.

The last thing you want with an evaporation pan (I'll come to that later) is rain water falling in it, the last thing you want in a rain gauge is evaporation, so it needs a bit of design to control for that and to stop rain splashing out.

This entry is essentially a set of partly-baked ideas, because before I got too far, I dropped this one from the book: that's why this entry is a bit deficient in photos.  Grab the idea and run with it, changing it as you go.

For my model, I decided to take a 1-litre milk bottle and lop the top off to make a funnel that would catch the rain and lead it in, and at the same time, stop too much loss by evaporation.

To make the base more stable and also to make the bottom level, I filled the bottom with water, added plaster.

Note well: you need to put down newspaper to work on before you use plaster, and you should clean up any spilled plaster with a vacuum cleaner.

If you have excess water in a container, the plaster powder settles down to a nice flat surface and it still sets, so use a spatula to add plaster powder to an excess of water.  Bounce the container up and down to flatten the plaster.

Then let the plaster set for an hour (20 minutes is enough, but it does no harm to be patient) and pour off the excess water.

On testing, I found that a bit of the water soaked into the plaster, so if I do this again, I will add water-based paint to seal the plaster. Also, if I did this again, I might use cement.

My first tests revealed that the rain gauge still blew over, so I made a stand for it from scrap timber. The second and third pictures show the basic design, near enough for you to make your own.

The wire came from a coat hanger, but note the spiral on the dowel. This is a special feature, because when you hold it, the spiral will slide up and down the dowel stick easily enough.

When you let go and it is hanging under its own weight, it clings.  You can see this in the second photograph.

I used this design feature later when I was rigging home-made stands for lights than I use for close-up and micro-photography—I'll talk about those some other time.

To finish it off, I suggest adding a scale up the side.


* * * * * * *
This blog covers quite a few different things, so I tag each post. I also blog about history, and I am currently writing a series of books called Not your usual... and the first two have been accepted by Five Mile Press, The offcuts appear here with the tag Not Your Usual... . For a taste of Australian tall tales, try the tags Speewah or Crooked Mick.   For a miscellany of oddities, try the tag temporary obsessions. And language us covered under the tags Descants and Curiosities, while stuff about small life is under Wee beasties.