 |
| A reminder of what you will need |
In this part, I want to describe how to make the mould in which we will form our fossils. Plaster of Paris is calcium sulfate hemihydrate, CaSO4.½H2O. (Sorry, can't get subscripts and superscripts here.) When you add water to it, it sets hard, forming calcium sulfate dehydrate, CaSO4.2H2O. This reaction happens even in an excess of water, which is a key to the process I am going to describe. We are going to use excess water to get a smooth surface.
Incidentally, I have formatted some of these photos as small on the page to conserve space, but if you click on them. You can see a larger version.
 First, get all of the stuff ready. You need two spatulas, one to shovel in the dry powder, the other to stir it gently. You need a water container, the plaster, some shells, and you must lay down newspaper to catch the plaster, which goes all over the place. Later, wrap the paper carefully and use a vacuum cleaner to pick up any powder that still spilled. Never use a damp cloth!!!
 Take one plastic container with sloping sides (you need to get the solid final product out later) and add some water, about a centimetre or a third of an inch if you don't use metric. Less is always best, because you can always add more.
Then add some plaster with the dry spatula, stir it with the designated "wet" spatula, and thump the tub up and down a few times to get the surface level. Don't worry about the excess water, as you can pour it off when the plaster sets, but watch out, because it will be solid in 20 minutes or less.
 |
| Notice the spillage here? |
Once you gave the shells in place, set the tub aside. I suggest doing two or three, because in the later stages, the cement casts can sometimes break, rather annoyingly.
While the plaster sets in 20 minutes, I usually leave it for an hour.
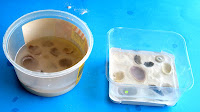
Now I have a disc (or square) of hard plaster which has shells embedded in it, making perfect impressions. Pour off the water in a safe place (a hole in the garden is good) and give the whole thing a good wash and wipe.
Now we are ready to get rid of the shells. Note that in chemist-speak, acid does not dissolve calcium carbonate: it reacts with it. Dissolving something is not really a chemical process, but what we are going to rely on is a chemical process. We are "dissolving" the shells, not dissolving them.
The reaction releases carbon dioxide gas, it bubbles, it foams, and when the bubbles burst, little droplets of acid fly off. They won't reach far, but the droplets can mark furniture and hurt pets. That is why I show the next stage going on in a plastic tub, and I put my tub in a weedy portion of a garden bed as well.
Acid safety
The acid isn't all that dangerous if you are careful. If you get any on you, use lots of water to rinse off., but wear safety goggles and rubber gloves, just in case.
 |
| And this is what I ended up with, about three hours (and 10 minutes' work) later. |
This began with Part 1.
It continued in Part 2.
It is continued in part 4, which is now available.


No comments:
Post a Comment